Todo in Xamarin Native Part 2 (iOS) 01 May 2018
In this post we’re going to create a todo application on iOS using Xamarin Native. We’ll see how we can leverage the Core code we’ve already written, allowing us to concentrate on the iOS specific code. This is a continuation of the Android app we created in part 1, so I recommend reading that first if you haven’t already. Full source code for this application is available on GitHub.
This post is part of a series where I create the same Todo application on iOS and Android using several different systems. To see the other posts in this series, check out the first post.
Tools and Environment
Note: If you’ve already read the previous post on creating the todo app with Xamarin Forms, this section will be very familiar to you and you can skip ahead to Creating Hello World
We can develop for Xamarin on either a PC or a Mac. On PC we would use Visual Studio (I’m using Visual Studio 2017 Community) and on Mac we would use Visual Studio for Mac, both available here. No matter which OS you develop on, you’ll need a Mac with XCode installed. If you’re developing on a Windows machine, Visual Studio will connect to the Mac for iOS compilation. This is needed because Apple requires a Mac to compile iOS applications.
With all this installed, we can now start building our app!
Creating Hello World
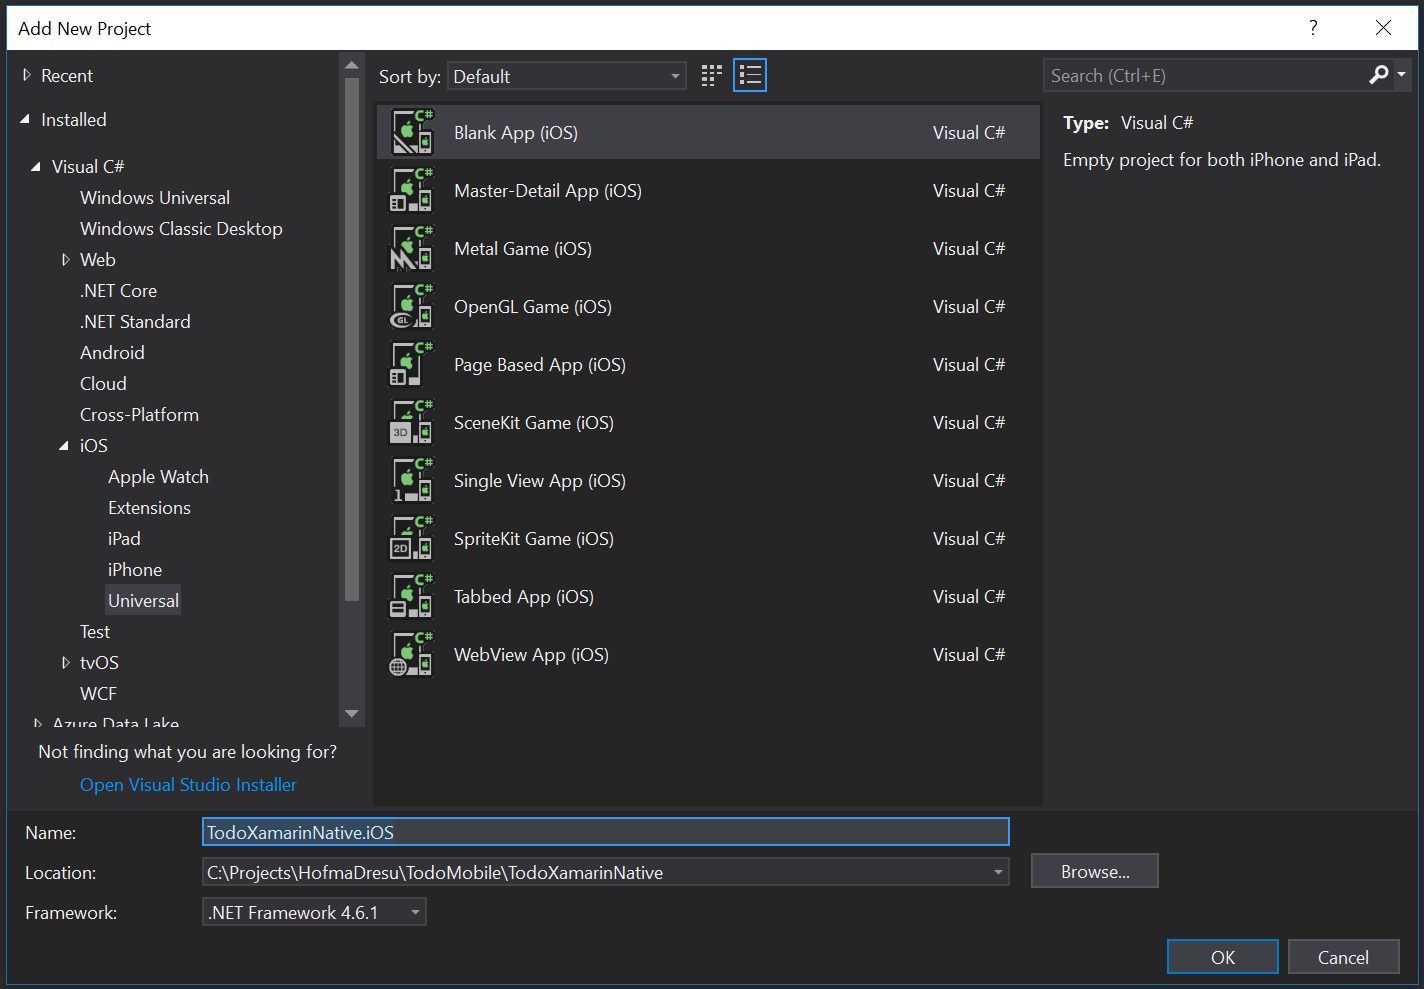
The first thing we want to do is create our default iOS project. Since we’re using our existing solution we can just add our new project to that. We can open TodoXamarinNative.sln then right click on the Solution and select “Add -> New Project…”. In the dialog that appears we’ll select “Visual C# -> iOS -> Universal -> Blank App (iOS)” and name the project TodoXamarinNative.iOS.
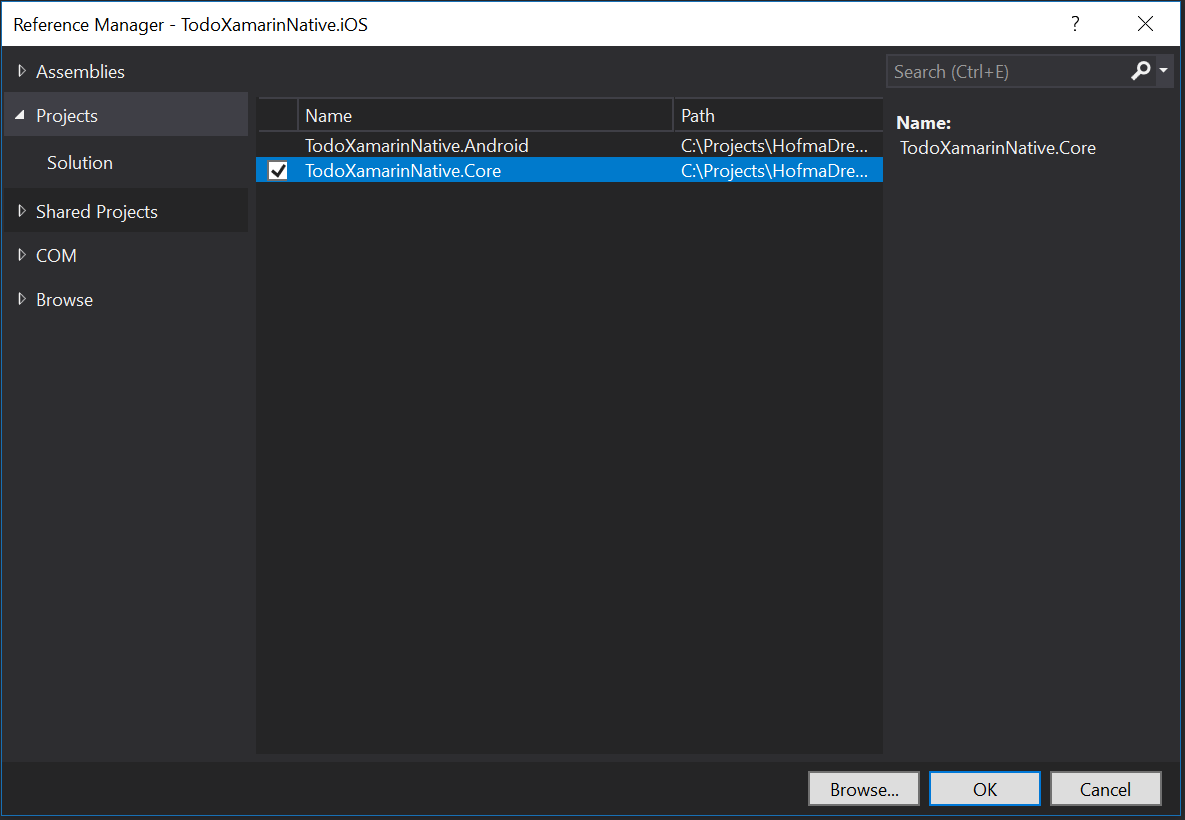
Next we need to create a reference from our new iOS project to Core. To do this, right click on References under TodoXamarinNative.iOS and select “Add Reference”. It should open a dialog with the Projects tab open (if not, select the Projects tab). We’ll select TodoXamarinNative.Core and click OK.
We now have a solution with 3 projects: Core, Android, and iOS. To run it on iOS we first tell Visual Studio to set our new project as startup project (right click on TodoXamarinNative.iOS and select “Set as Startup Project”). If we try to run our application now we’ll see it start up but throw an exception. This is because we still need to create our initial screen. There are a couple ways to do this, the most common of which are using a Storyboard or creating it through code. We’re going to opt for the code approach here. While this doesn’t give us the designer tools that a storyboard would, it’s much easier for both maintenance and when working with other developers.
Our application can be run right now, but it will throw an exception if we try. This is because we haven’t actually created our initial view yet. To do this we need to create a new View Controller and tell iOS to use it as our Root View Controller. We’ll add the view controller by clicking “Add Class” on our iOS project and name it MainViewController.
You could almost certainly come up with a more descriptive name, but this lines up nicely with our MainActivity in the Android project. I find it convenient to use similar names between OSs wherever possible. We then need to tell our class to inherit from UIViewController and give it a title and background color.
using UIKit;

namespace TodoXamarinNative.iOS
{
    class MainViewController : UIViewController
    {
        public MainViewController()
        {
            Title = "Todo List";
            View.BackgroundColor = UIColor.White;
        }
    }
}
Then we’ll open AppDelegate.cs and update FinishedLaunching with our new MainViewController. We’re also going to wrap our view controller in a UINavigationController. This gives us a few useful things:
- It automatically handles the top safe area on iPhone X
- It displays our title
- It sets up navigation that we’ll need later in the app
public override bool FinishedLaunching(UIApplication application, NSDictionary launchOptions)
{
    // create a new window instance based on the screen size
    Window = new UIWindow(UIScreen.MainScreen.Bounds);

    // If you have defined a root view controller, set it here:
    Window.RootViewController = new UINavigationController(new MainViewController());

    // make the window visible
    Window.MakeKeyAndVisible();

    return true;
}
Now when we run it, we’ll see the default application.
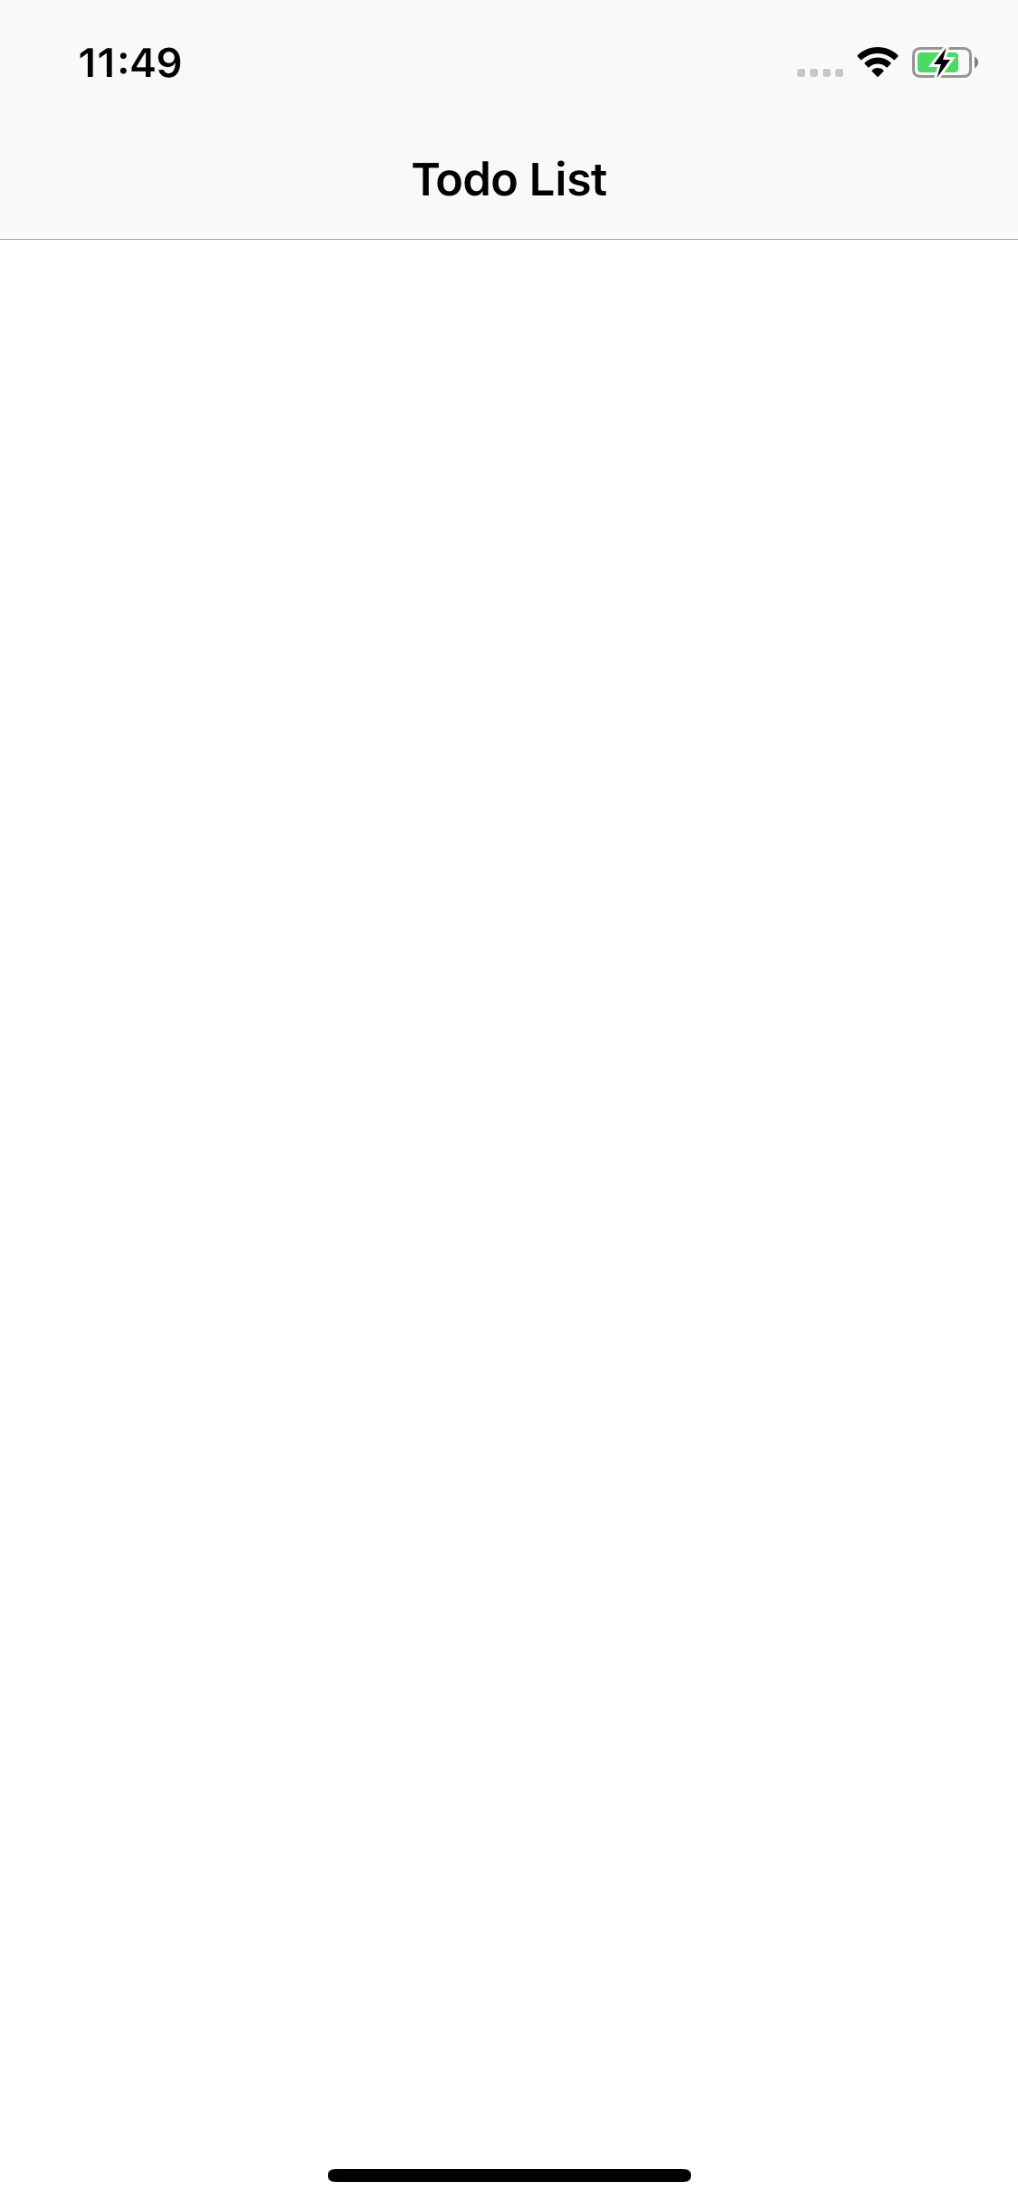
Our application is now up and running, but it’s not exactly what one would call “exciting” or “useful” yet. That’s what we’re going to do in the rest of this post!
Connecting to the data layer
Before we get to the meat of our UI, we need to connect to the data layer. The first thing we need to do is add the sqlite-net-pcl nuget package to our iOS project.

Next we’ll open AppDelegate.cs in our iOS project and add a new static property called TodoRepository. Then we’ll edit the FinishedLaunching method and instantiate the new property.
...
public static TodoRepository TodoRepository;
...
public override bool FinishedLaunching(UIApplication application, NSDictionary launchOptions)
{
    var docFolder = Environment.GetFolderPath(Environment.SpecialFolder.Personal);
    var libFolder = Path.Combine(docFolder, "..", "Library", "Databases");

    if (!Directory.Exists(libFolder))
    {
        Directory.CreateDirectory(libFolder);
    }

    var repositoryFilePath = Path.Combine(libFolder, "TodoRepository.db3");
    TodoRepository = new TodoRepository(repositoryFilePath);

    return true;
}
...
Displaying a list of Todo Items
Now that we’ve finished our data layer, it’s time to actually show something to the user! At this point we’re switching out of shared code and will be working entirely in the iOS project. We’ll start by displaying a simple list of our Todo Items without any user interaction.
There are several ways to create UIs in iOS, the most common of which are Storyboards and through code. Storyboards are designer files that allow you to lay out the UI of multiple screens and the transitions between them. They are reasonably nice to use if you’re the sole developer, however they can quickly become complicated and cause conflicts if there are multiple developers. Instead we’re going to create our UI in code. In my opinion, this is better both for version control and for multi-developer scenarios.
We need to create two things to display our list: a UITableView to hold our items and a UITableViewSource to translate our list into rows in the table (this is similar in concept to the Adapter we used on the Android side). We’ll start with the UITableViewSource by creating a new class called TodoItemTableSource. We’ll add a constructor that takes in a list of TodoItems and implement the GetCell and RowsInSection methods.
using System;
using System.Collections.Generic;
using Foundation;
using TodoXamarinNative.Core;
using UIKit;

namespace TodoXamarinNative.iOS
{
    class TodoItemTableSource : UITableViewSource
    {
        private const string CellIdentifier = "TodoItemCell";
        private readonly List<TodoItem> _todoItems;

        public TodoItemTableSource(List<TodoItem> todoItems)
        {
            _todoItems = todoItems;
        }

        public override UITableViewCell GetCell(UITableView tableView, NSIndexPath indexPath)
        {
            var cell = new UITableViewCell(UITableViewCellStyle.Default, CellIdentifier);
            cell.TextLabel.Text = _todoItems[indexPath.Row].Title;
            return cell;
        }

        public override nint RowsInSection(UITableView tableview, nint section)
        {
            return _todoItems.Count;
        }
    }
}
Note: we’re using the built in UITableViewCellStyle.Default for our cell’s layout. There are a few other options built in, but we could also create our own custom cell.
We also need open our MainViewController and add + populate the list. We’ll do this by creating the list in ViewDidLoad and populating it in ViewDidAppear. The only part of this that isn’t obvious is that we’re using constraints to position our list. Constraints tell iOS how to position our view and work well across multiple device sizes.
public override void ViewDidLoad()
{
    base.ViewDidLoad();

    _todoTableView = new UITableView
    {
        TranslatesAutoresizingMaskIntoConstraints = false
    };
    View.Add(_todoTableView);

    _todoTableView.TopAnchor.ConstraintEqualTo(View.TopAnchor).Active = true;
    _todoTableView.BottomAnchor.ConstraintEqualTo(View.BottomAnchor).Active = true;
    _todoTableView.LeftAnchor.ConstraintEqualTo(View.LeftAnchor).Active = true;
    _todoTableView.RightAnchor.ConstraintEqualTo(View.RightAnchor).Active = true;
}

public override async void ViewDidAppear(bool animated)
{
    base.ViewDidAppear(animated);

    var todoList = await AppDelegate.TodoRepository.GetList();
    _todoTableView.Source = new TodoItemTableSource(todoList);
    _todoTableView.ReloadData();
}
Setting .Active = true on each of our constraints looks weird, but if we don’t do this the app won’t use those settings
Now our application will display the list of our Todos!
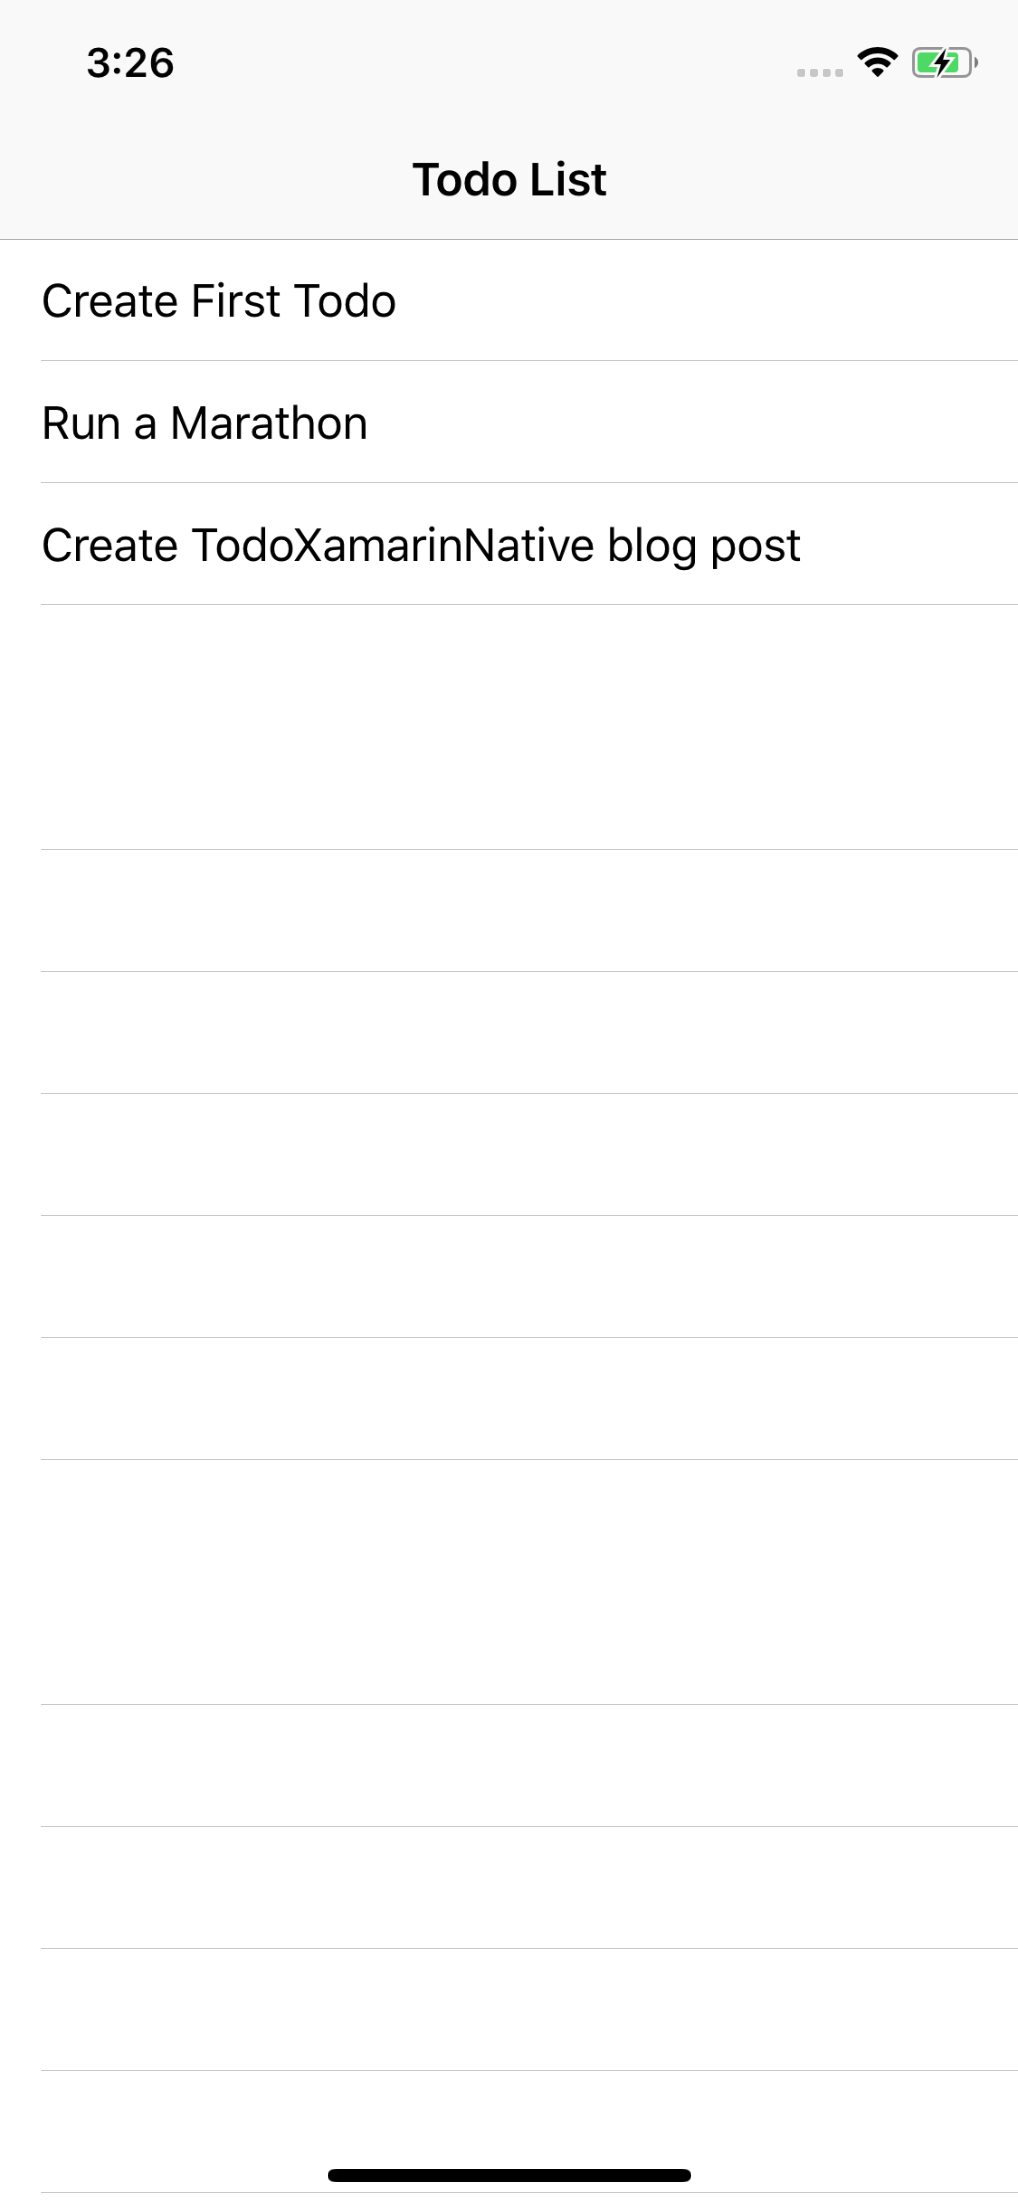
The only thing remaining that we should show is whether-or-not the items are completed. We’re going to deviate from how we did this on Android and add sections to our list. iOS makes this easy to do, and we only need to make a couple alterations to our TodoItemTableSource. We need to order our list correctly, update the RowsInSection override, and implement both NumberOfSections and TitleForHeader.
    ...
    public TodoItemTableSource(List<TodoItem> todoItems)
    {
        _todoItems = todoItems.OrderBy(t => t.IsCompleted).ToList();
    }
    ...
    public override nint RowsInSection(UITableView tableview, nint section)
    {
        return _todoItems.Count(t => t.IsCompleted == (section == 1));
    }

    public override nint NumberOfSections(UITableView tableView) => 2;

    public override string TitleForHeader(UITableView tableView, nint section) => section == 0 ? "Active" : "Completed";
}
Finally we need to update GetCell to look at the correct item. This needs to change because indexPath.Row returns the row relative to the section, so our third item (the first completed item) gives a row of 0. We’ll create a helper method to do this, since we’ll need the functionality later as well.
...
public override UITableViewCell GetCell(UITableView tableView, NSIndexPath indexPath)
{
    var cell = new UITableViewCell(UITableViewCellStyle.Default, CellIdentifier);
    cell.TextLabel.Text = GetItem(indexPath).Title;
    return cell;
}

public TodoItem GetItem(NSIndexPath indexPath)
{
    var releventList = indexPath.Section == 0 ? _activeItems : _completedItems;
    return releventList.ToList()[indexPath.Row];
}
...
With this done we can run our application and see our grouped items.
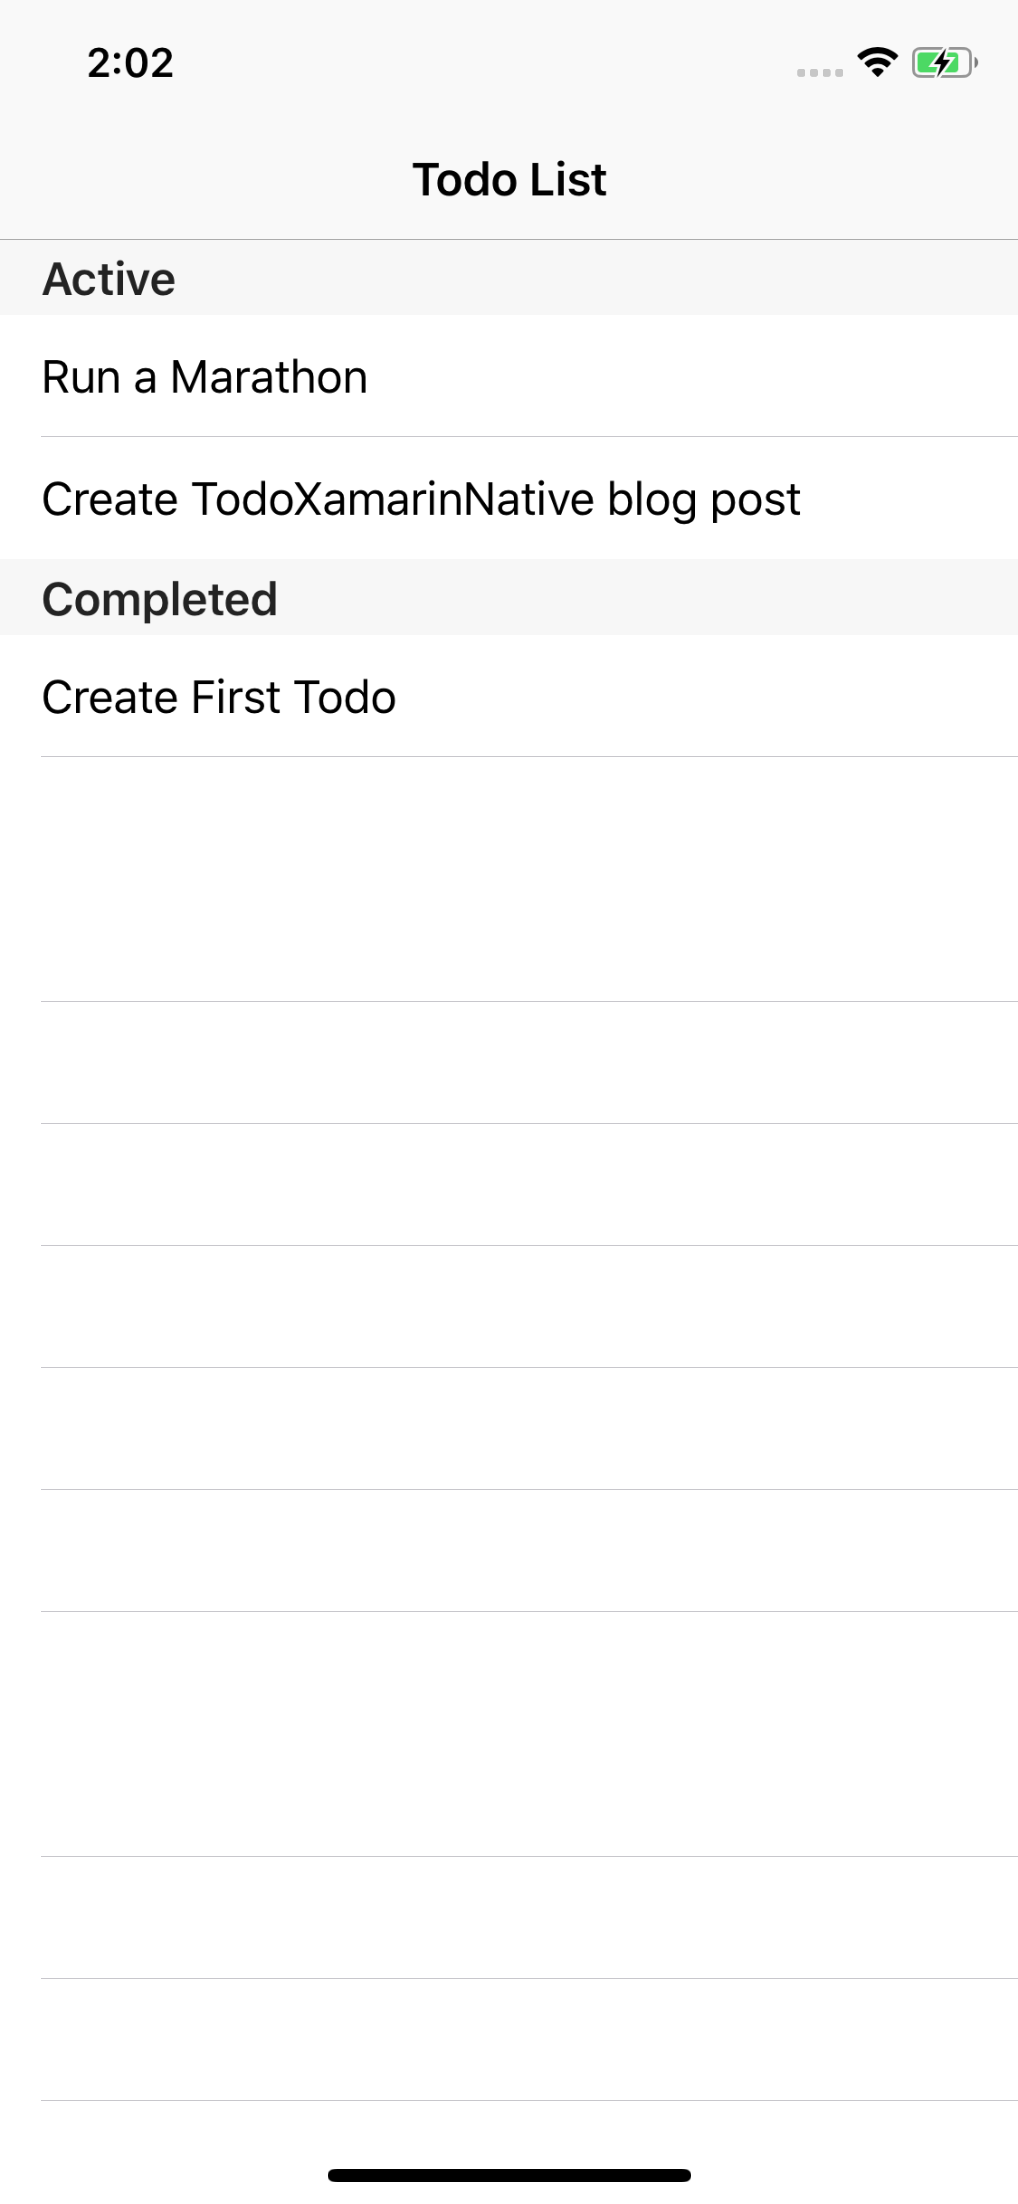
Now we can start adding actions to our list!
Completing, Uncompleting, and Deleting Items
We’re going to start by implementing actions that the user can take without leaving the main screen: Completing, Uncompleting, and Deleting items. Much like displaying the items, this involves platform specific code to wire up.
The first thing we’ll do is display the action buttons to the user without backing them with functionality. We’re going to use iOS’s “swipe left” functionality to display our buttons. This involves a decent number of changes, so hang tight!
First thing we need to do is update our TodoItemTableSource and tell it that we want to enable edit on our rows. For this we need to override two new methods.
    ...
    public override bool CanEditRow(UITableView tableView, NSIndexPath indexPath)
    {
        return true;
    }

    public override void CommitEditingStyle(UITableView tableView, UITableViewCellEditingStyle editingStyle, NSIndexPath indexPath)
    {
    }
}
One interesting thing to note is that we overrode CommitEditingStyle but didn’t do anything. iOS requires this to be overridden when we add our edit buttons, but we don’t have anything we want to do with it. Additionally: we should not call the base method for this, so we’re just leaving it empty.
Next we need to create a UITableViewDelegate to handle displaying and responding to our buttons. We’ll do this by creating a new class that subclasses UITableViewDelegate and implementing EditActionsForRow. This is where we’ll use the GetItem method that we added to our TodoItemTableSource. We’ll also add a couple events in preparation for completing our actions.
using System;
using Foundation;
using TodoXamarinNative.Core;
using UIKit;

namespace TodoXamarinNative.iOS
{
    class TodoTableDelegate : UITableViewDelegate
    {
        public EventHandler<TodoItem> OnIsCompletedToggled;
        public EventHandler<TodoItem> OnTodoDeleted;

        public override UITableViewRowAction[] EditActionsForRow(UITableView tableView, NSIndexPath indexPath)
        {
            var source = tableView.Source as TodoItemTableSource;
            var selectedItem = source.GetItem(indexPath);

            UITableViewRowAction editButton = UITableViewRowAction.Create(
                UITableViewRowActionStyle.Normal,
                selectedItem.IsCompleted ? "Uncomplete" : "Complete",
                (arg1, arg2) => OnIsCompletedToggled?.Invoke(this, selectedItem));
            UITableViewRowAction deleteButton = UITableViewRowAction.Create(
                UITableViewRowActionStyle.Destructive,
                "Delete",
                (arg1, arg2) => OnTodoDeleted?.Invoke(this, selectedItem));
            return new UITableViewRowAction[] { deleteButton, editButton };
        }
    }
}
The last thing we need to do is tell our table view to use our new delegate. We’ll do this in MainViewController by adding a new private field _todoTableDelegate, instantiating it in ViewDidLoad, and setting it in ViewDidAppear.
...
private TodoTableDelegate _todoTableDelegate;
...
public override void ViewDidLoad()
{
    ...
    _todoTableDelegate = new TodoTableDelegate();
    ...
}

public override async void ViewDidAppear(bool animated)
{
    ...
    _todoTableView.Delegate = _todoTableDelegate;
    _todoTableView.ReloadData();
}
With all of that set, we can run our app and swipe left on items to see our action buttons!
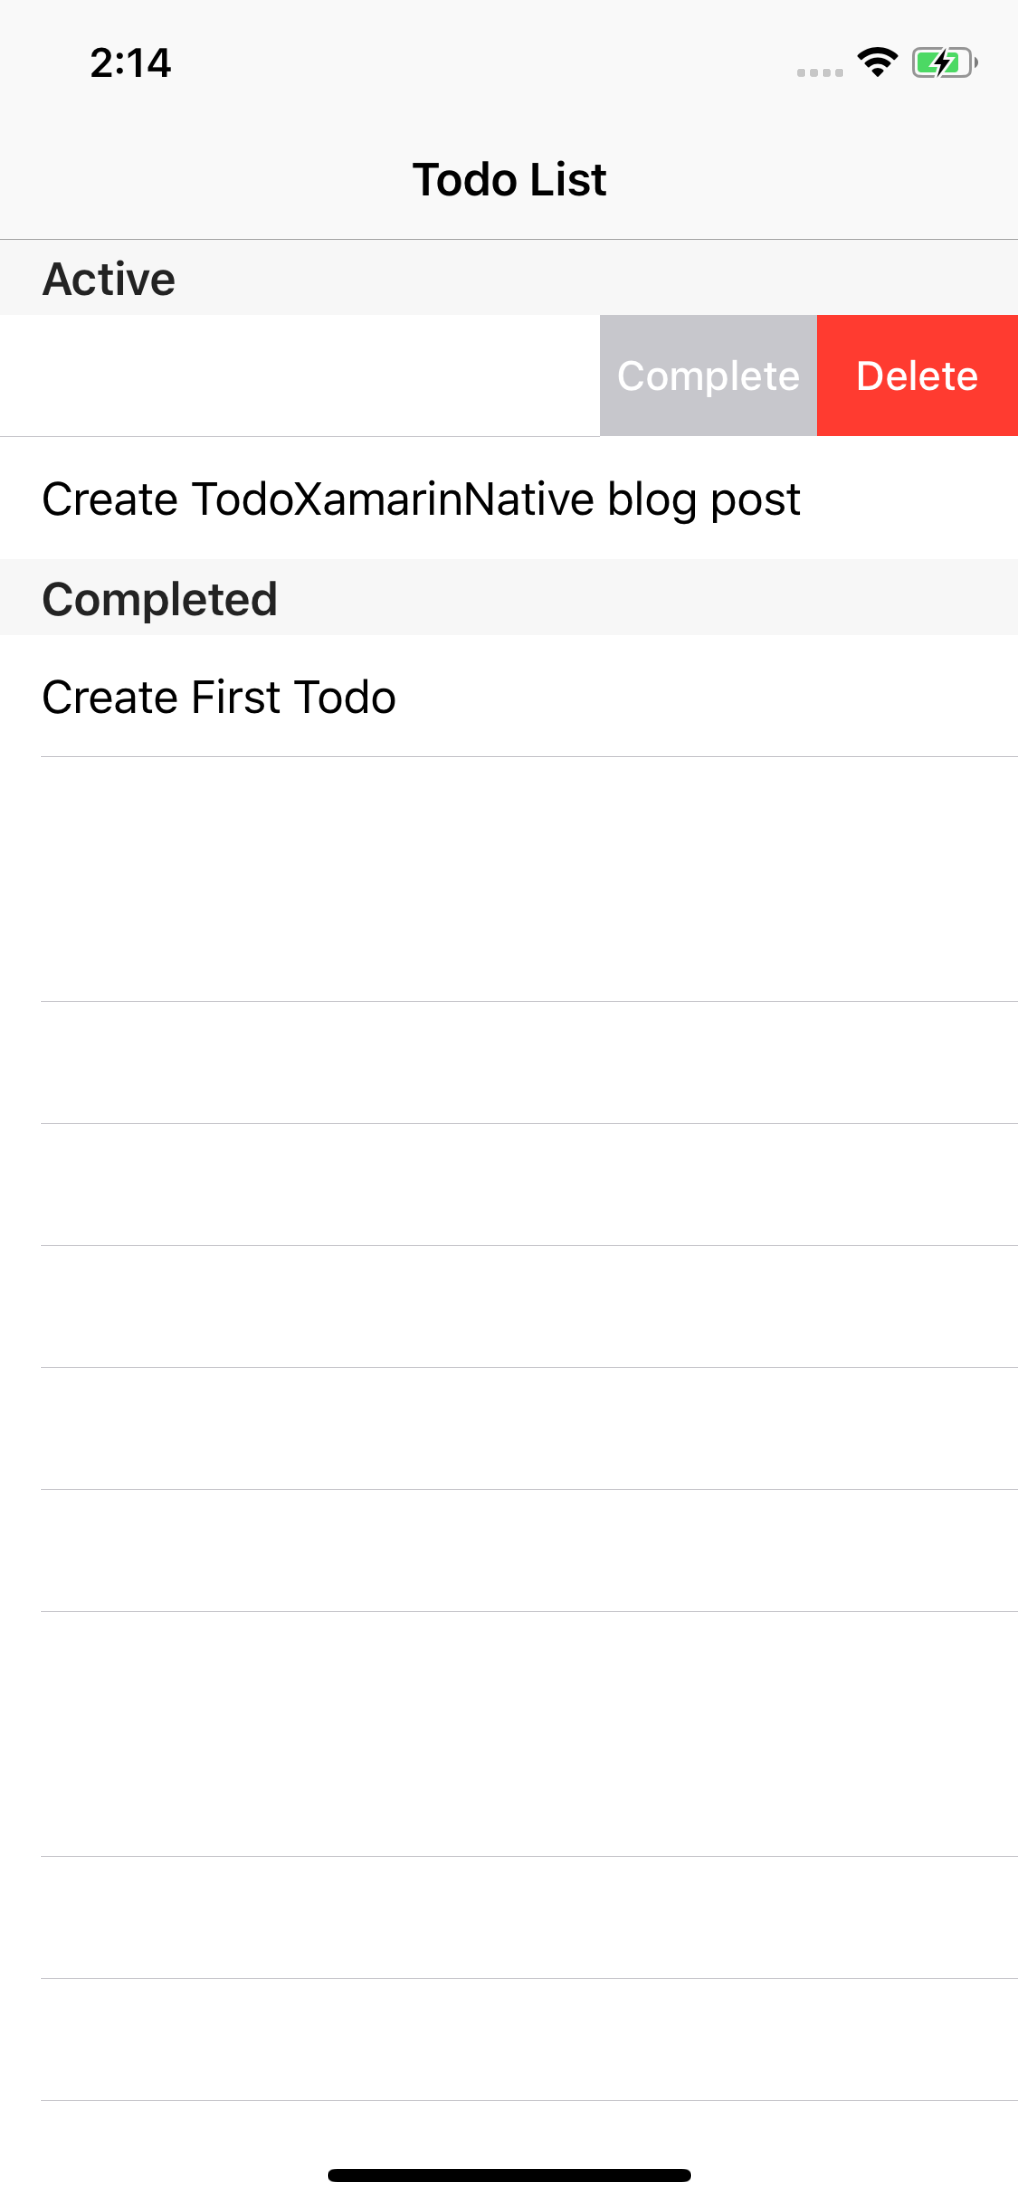
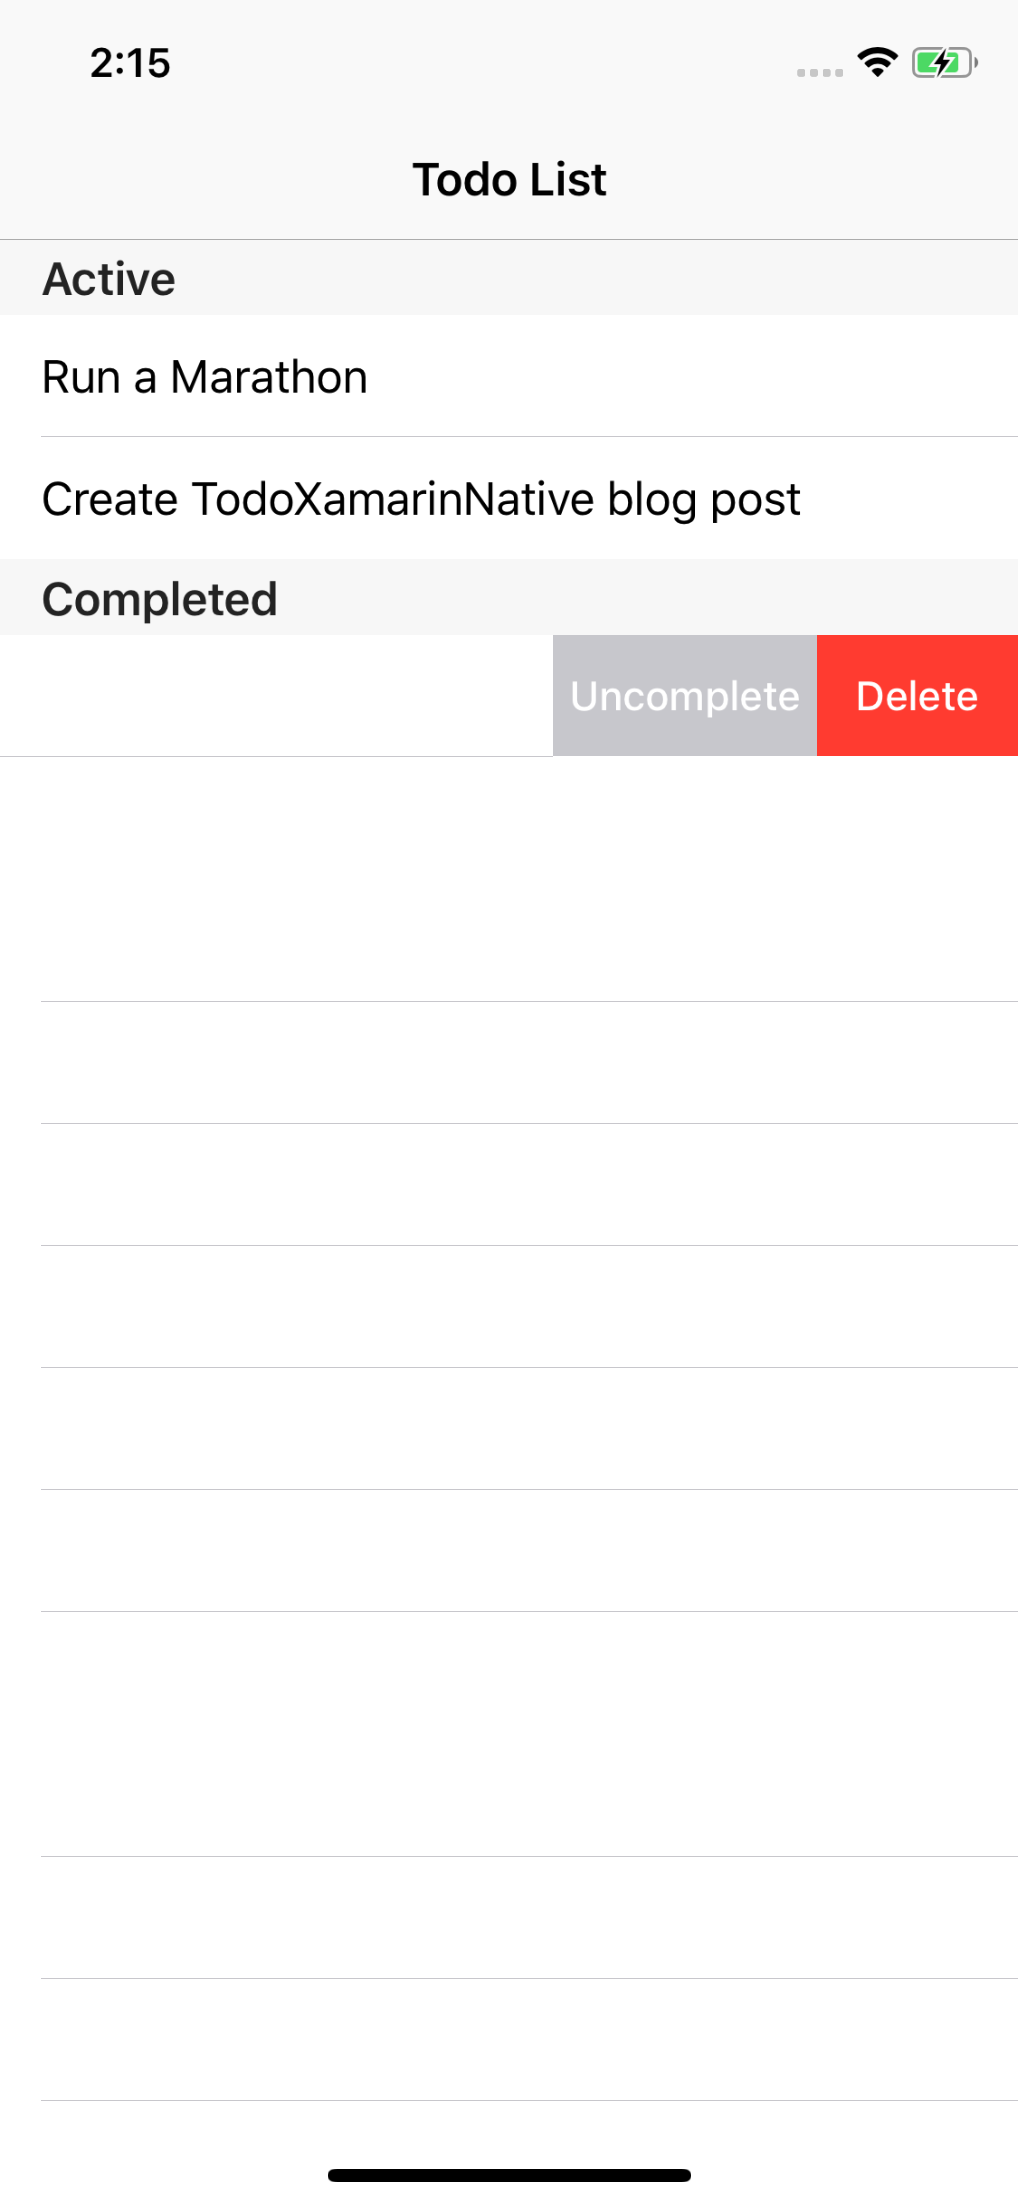
Next we’ll want to have our buttons actually do something. We’ll do this in MainViewController by subscribing to the event handlers we created in TodoTableDelegate. For good practice, we’ll also unsubscribe from them in ViewDidDisappear. We’ll also split some ouf our ViewDidAppear code off into a separate methods that we can re-use.
...
public override async void ViewDidAppear(bool animated)
{
    base.ViewDidAppear(animated);

    await PopulateTable();
    _todoTableDelegate.OnIsCompletedToggled += HandleIsCompletedToggled;
    _todoTableDelegate.OnTodoDeleted += HandleTodoDeleted;
}

private async Task PopulateTable()
{
    var todoList = await AppDelegate.TodoRepository.GetList();
    _todoTableView.Source = new TodoItemTableSource(todoList);
    _todoTableView.Delegate = _todoTableDelegate;
    _todoTableView.ReloadData();
}

public override void ViewDidDisappear(bool animated)
{
    base.ViewDidDisappear(animated);
    _todoTableDelegate.OnIsCompletedToggled -= HandleIsCompletedToggled;
    _todoTableDelegate.OnTodoDeleted -= HandleTodoDeleted;
}

private async void HandleIsCompletedToggled(object sender, TodoItem targetItem)
{
    await AppDelegate.TodoRepository.ChangeItemIsCompleted(targetItem);
    await PopulateTable();
}

private async void HandleTodoDeleted(object sender, TodoItem targetItem)
{
    await AppDelegate.TodoRepository.DeleteItem(targetItem);
    await PopulateTable();
}
...
Now when we run the application we can complete, uncomplete, and delete items!
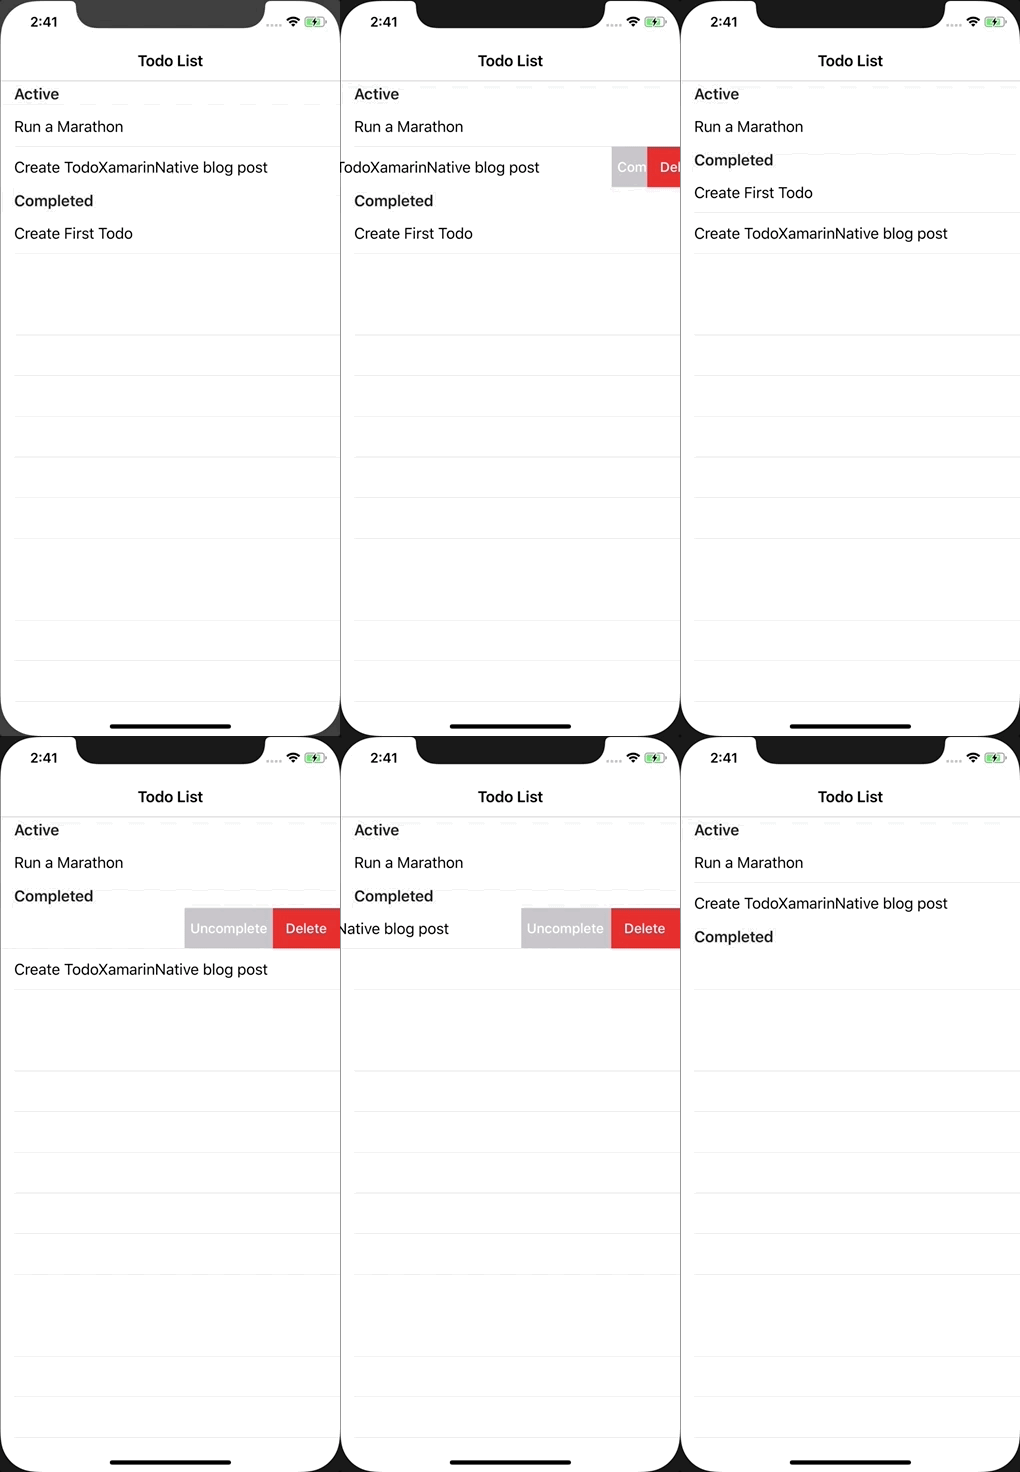
Adding Todo Items
Our app is doing pretty well at this point, but we’re missing one very important feature: adding new todo items! We’re going to add a button to our todo list screen and create a new screen where the user can enter their item. Following the pattern of the previous two sections, this will involve solely OS specific code.
The first thing we want to do is create an “Add Todo Item” button for the user to click. We’ll do this by editing ViewDidLoad in our MainViewController. We need to create a new System button, set its text, add it to the view, and adjust our constraints to place it at the bottom of the screen.
...
public override void ViewDidLoad()
{
    ...
    _addItemButton = new UIButton(UIButtonType.System)
    {
        TranslatesAutoresizingMaskIntoConstraints = false,
    };
    _addItemButton.SetTitle("Add Todo Item", UIControlState.Normal);
    View.Add(_addItemButton);

    _todoTableView.TopAnchor.ConstraintEqualTo(View.TopAnchor).Active = true;
    _todoTableView.BottomAnchor.ConstraintEqualTo(_addItemButton.TopAnchor).Active = true;
    _todoTableView.LeftAnchor.ConstraintEqualTo(View.LeftAnchor).Active = true;
    _todoTableView.RightAnchor.ConstraintEqualTo(View.RightAnchor).Active = true;

    _addItemButton.TopAnchor.ConstraintEqualTo(_todoTableView.BottomAnchor).Active = true;
    _addItemButton.BottomAnchor.ConstraintEqualTo(View.LayoutMarginsGuide.BottomAnchor).Active = true;
    _addItemButton.CenterXAnchor.ConstraintEqualTo(View.CenterXAnchor).Active = true;
}
Notice that we change the Bottom Anchor of our table view to be the top of the button. We also used a new constraint for the bottom of the button: LayoutMarginsGuide. This lets us position the button within the ‘safe area’ of iPhone X devices. Make sure to set your button’s type when creating it. The button will still be created if this step is missed, however the button won’t be styled and will likely be invisible on the screen.
We can now run our app and see the button at the bottom of our screen.
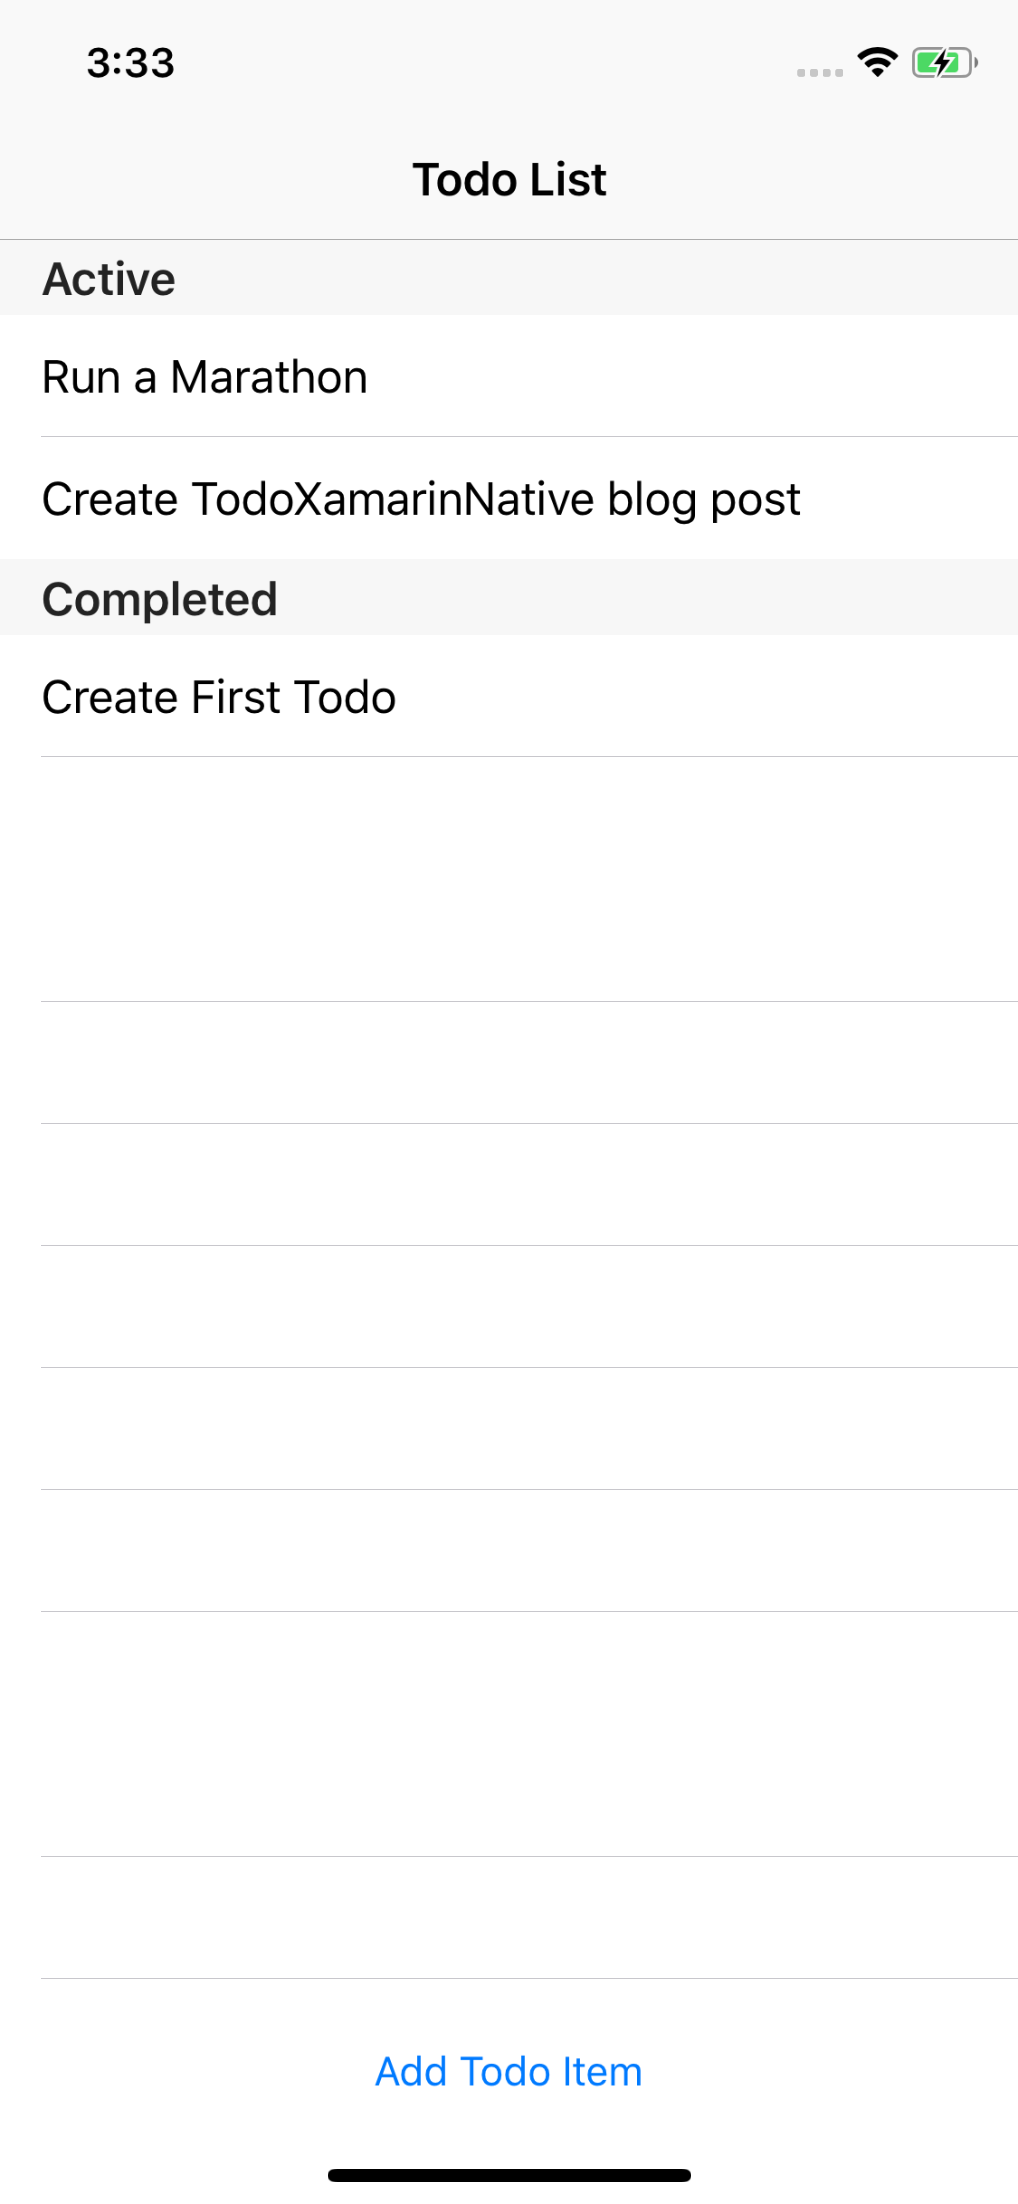
Next we should make our button actually do something. We’re going to have it navigate to a new screen where the user can create a todo item. First we should create the target screen. We’ll make a new UIViewController called AddTodoItemViewController and place 3 items on the screen: a UITextField, a cancel UIButton, and a save UIButton.
using UIKit;

namespace TodoXamarinNative.iOS
{
    class AddTodoItemViewController : UIViewController
    {
        private UITextField _todoTitleView;
        private UIButton _saveButton;
        private UIButton _cancelButton;

        public AddTodoItemViewController()
        {
            Title = "Add Todo Item";
            View.BackgroundColor = UIColor.White;
        }

        public override void ViewDidLoad()
        {
            base.ViewDidLoad();

            // Use a container view to easily center our components on the screen
            var containerView = new UIView
            {
                TranslatesAutoresizingMaskIntoConstraints = false,
            };

            View.Add(containerView);

            containerView.CenterXAnchor.ConstraintEqualTo(View.CenterXAnchor).Active = true;
            containerView.CenterYAnchor.ConstraintEqualTo(View.CenterYAnchor).Active = true;
            containerView.WidthAnchor.ConstraintEqualTo(View.WidthAnchor, .7f).Active = true;

            _todoTitleView = new UITextField
            {
                TranslatesAutoresizingMaskIntoConstraints = false,
                Placeholder = "Enter Todo Title",
            };
            containerView.Add(_todoTitleView);
            _todoTitleView.BecomeFirstResponder();

            _cancelButton = new UIButton(UIButtonType.System)
            {
                TranslatesAutoresizingMaskIntoConstraints = false,
            };
            _cancelButton.SetTitle("Cancel", UIControlState.Normal);
            containerView.Add(_cancelButton);

            _saveButton = new UIButton(UIButtonType.System)
            {
                TranslatesAutoresizingMaskIntoConstraints = false,
            };
            _saveButton.SetTitle("Save", UIControlState.Normal);
            containerView.Add(_saveButton);

            _todoTitleView.TopAnchor.ConstraintEqualTo(containerView.TopAnchor).Active = true;
            _todoTitleView.LeftAnchor.ConstraintEqualTo(containerView.LeftAnchor).Active = true;
            _todoTitleView.RightAnchor.ConstraintEqualTo(containerView.RightAnchor).Active = true;

            _cancelButton.TopAnchor.ConstraintEqualTo(_todoTitleView.BottomAnchor).Active = true;
            _cancelButton.LeftAnchor.ConstraintEqualTo(containerView.LeftAnchor).Active = true;
            _cancelButton.BottomAnchor.ConstraintEqualTo(containerView.BottomAnchor).Active = true;

            _saveButton.TopAnchor.ConstraintEqualTo(_todoTitleView.BottomAnchor).Active = true;
            _saveButton.RightAnchor.ConstraintEqualTo(containerView.RightAnchor).Active = true;
            _saveButton.BottomAnchor.ConstraintEqualTo(containerView.BottomAnchor).Active = true;
        }
    }
}
We used a new constraint feature here: the multiplier. We told our container view to have a width equal to 70% of our screen’s width
We’ll then update MainViewController to navigate to AddTodoItemViewController when the button is clicked.
...
public override async void ViewDidAppear(bool animated)
{
    ...
    _addItemButton.TouchUpInside += AddItemTouched;
}

private void AddItemTouched(object sender, System.EventArgs e)
{
    NavigationController.PushViewController(new AddTodoItemViewController(), true);
}
...
public override void ViewDidDisappear(bool animated)
{
    ...
    _addItemButton.TouchUpInside -= AddItemTouched;
}
And when we run the app and click on our button, we’ll see the new screen we created.
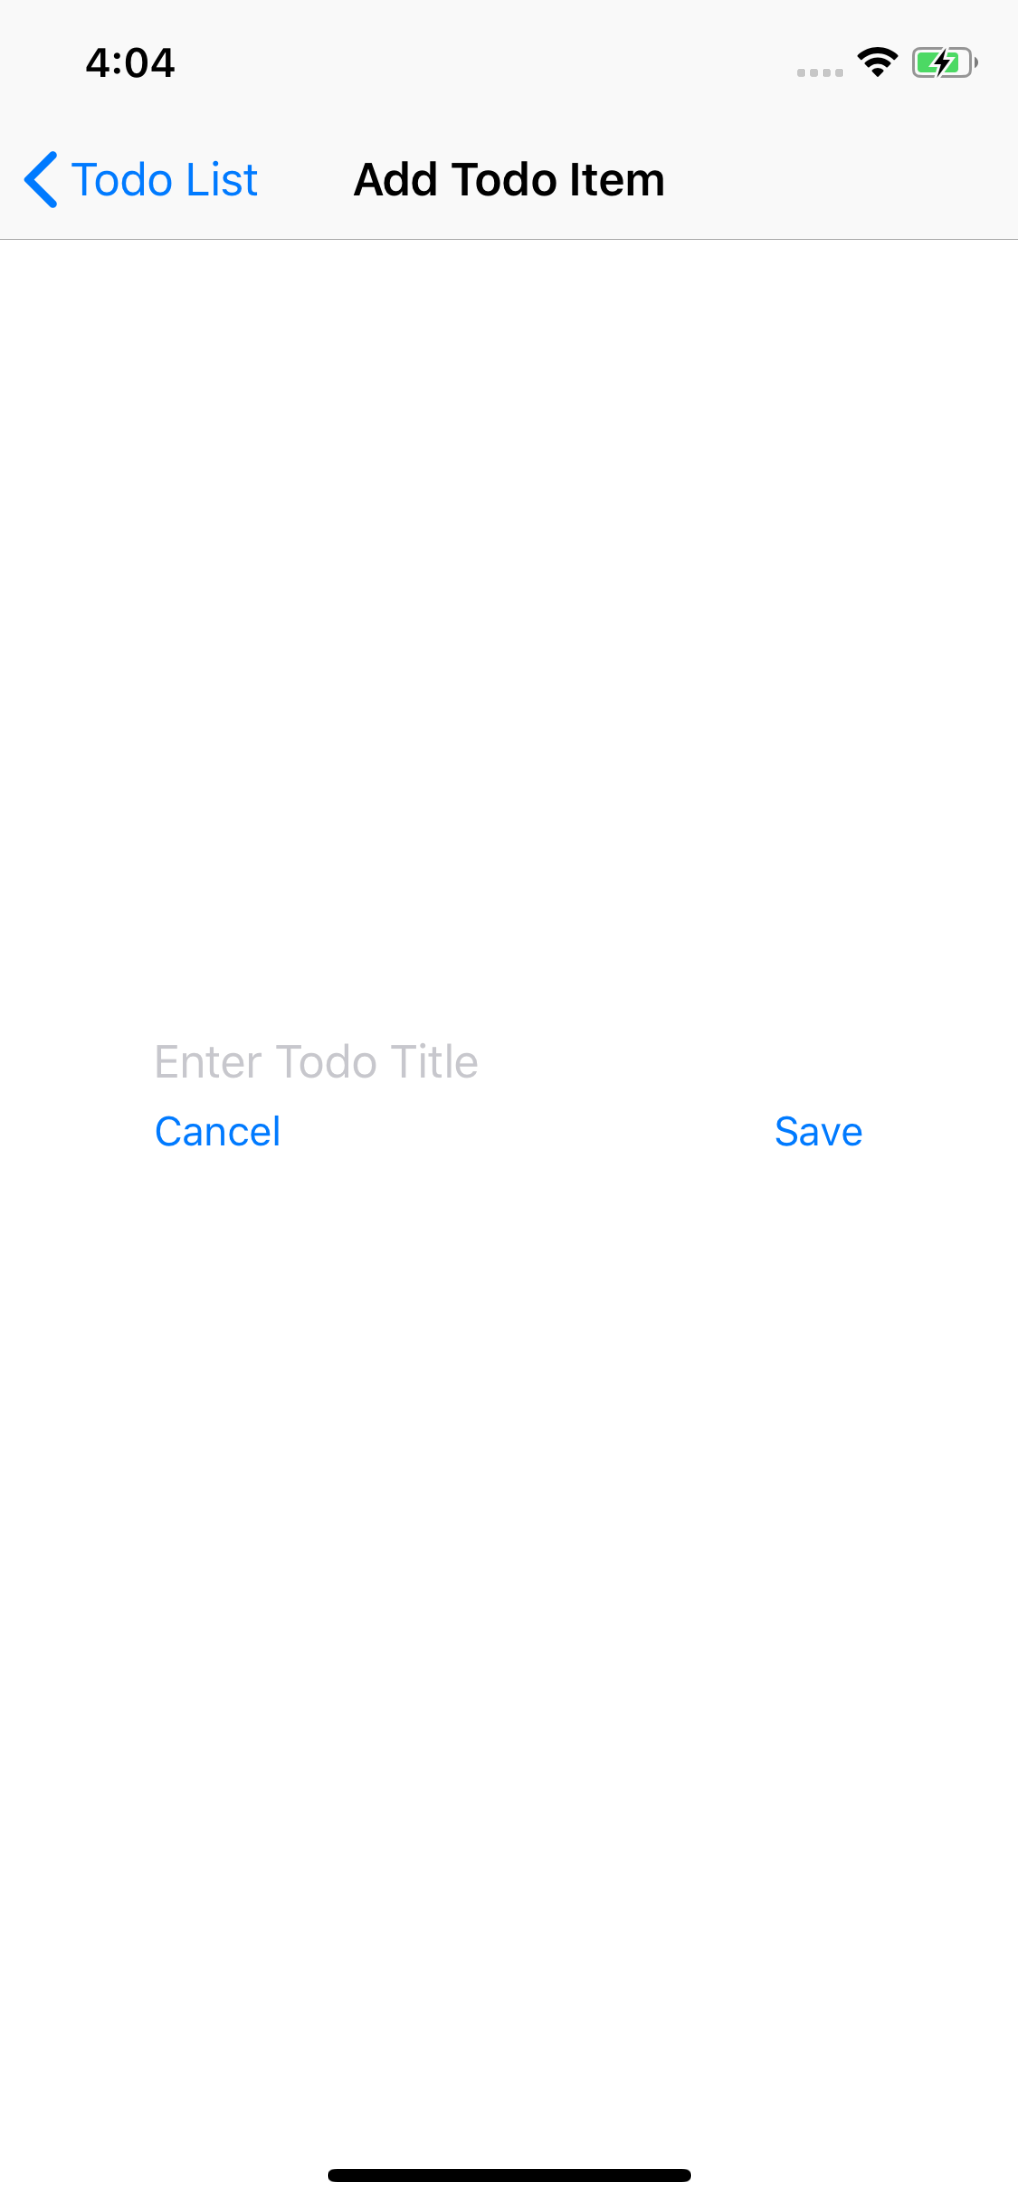
Now all we need to do is implement our Save and Cancel buttons. We’ll create a method for each, subscribing to TouchUpInside in ViewDidAppear and unsubscribing in ViewDidDisappear.
...
public override void ViewDidAppear(bool animated)
{
    base.ViewDidAppear(animated);
    _cancelButton.TouchUpInside += HandleCancelTouched;
    _saveButton.TouchUpInside += HandleSaveTouched;
}

private async void HandleSaveTouched(object sender, System.EventArgs e)
{
    await AppDelegate.TodoRepository.AddItem(new TodoItem { Title = _todoTitleView.Text });
    NavigationController.PopViewController(true);
}

private void HandleCancelTouched(object sender, System.EventArgs e)
{
    NavigationController.PopViewController(true);
}

public override void ViewDidDisappear(bool animated)
{
    base.ViewDidDisappear(animated);
    _cancelButton.TouchUpInside -= HandleCancelTouched;
    _saveButton.TouchUpInside -= HandleSaveTouched;
}
...
Now we can run our app and add new items!
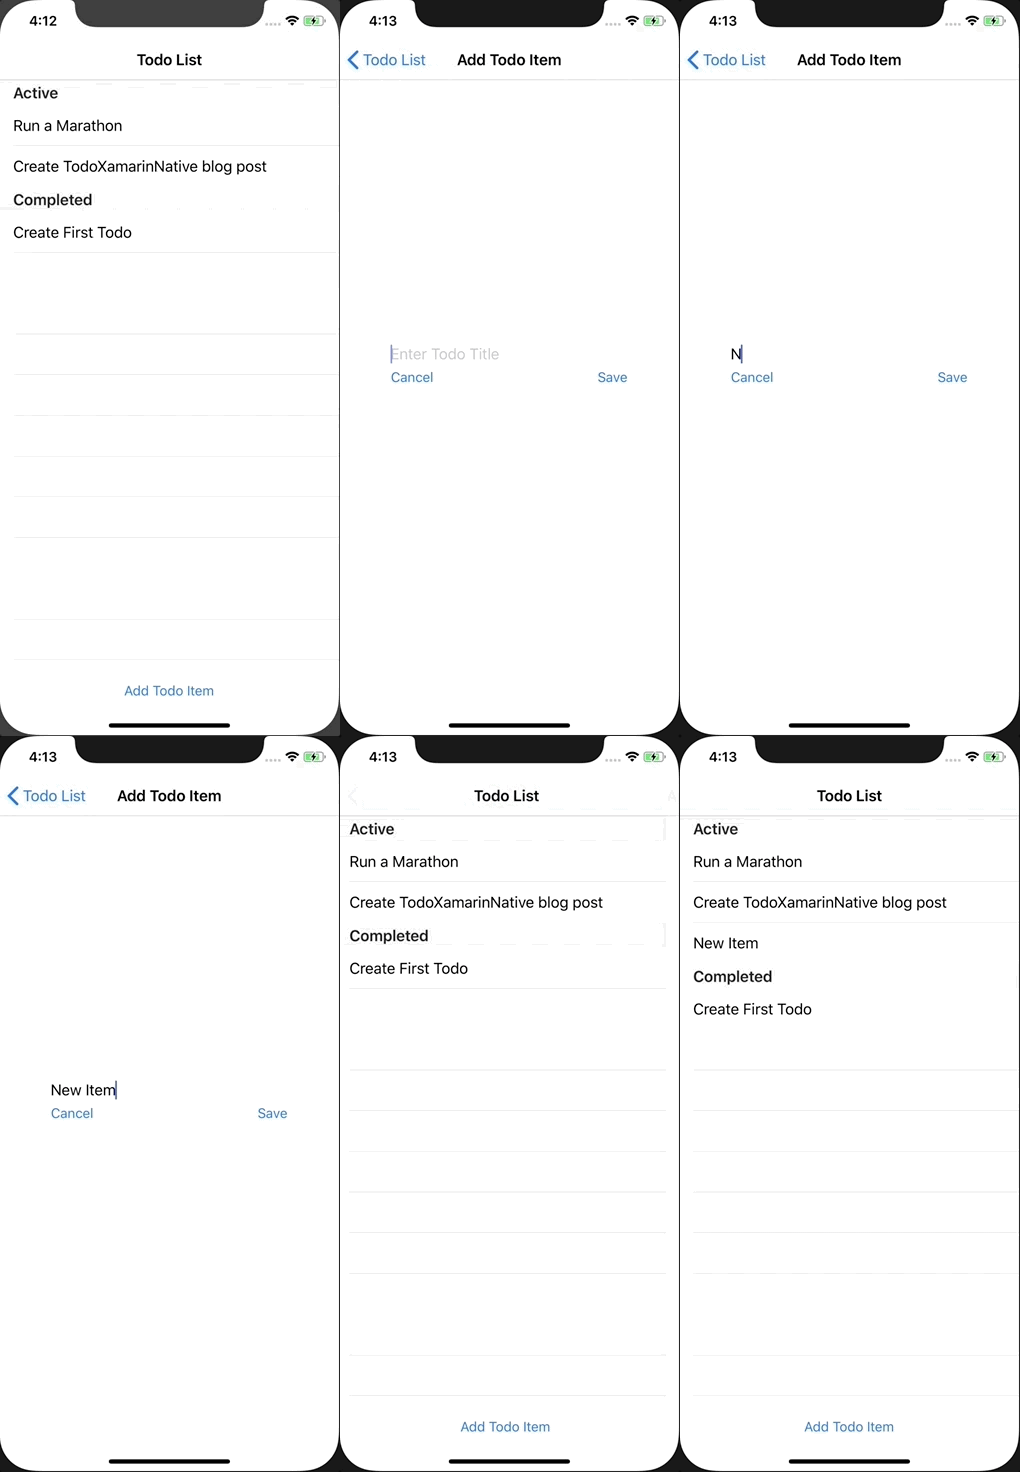
I have my simulator set to hide the onscreen keyboard and allow me to use my computer’s keyboard. The user would see the on screen keyboard on a real device.
Conclusion
And there we have it! We’ve created a simple Todo application for both iOS and Android using Xamarin Native. We’ve created the UIs using native-style platform specific code while sharing our data storage code between the platforms. While we didn’t do a lot with shared code, hopefully you can see how we would use the same technique for things like business logic, web request, or most other non-UI functionality you need.
