
Todo in Xamarin Native Part 1 (Android) 29 Apr 2018
In this post we’re going to create a todo application on Android using Xamarin Native. Xamarin is a cross platform development tool on the .NET stack that allows you to share application logic and other ‘core’ code (like data persistence, API access, etc) across target platforms. To get started we’re going to create the default project files and see what Xamarin gives us out of the box. Full source code for this application is available on GitHub. This solution also contains the iOS code we’ll create in Part 2.
Note: All of my steps are using Visual Studio 2017 Community on Windows. Your mileage may vary if you work on a different edition of VS or on Visual Studio for Mac.
Note 2: If you ever see a runtime error similar to “Android.Content.Res.Resources+NotFoundException: File res/drawable-xxhdpi-v4/abc_ab_share_pack_mtrl_alpha.9.png from xml type layout resource ID #0x7f020000”, clean your solution and re-run. It also may help to make sure all axml files are closed when you start your build. I’m not sure what causes this issue, but it seems to crop up every now and then after making a change to an axml file.
This post is part of a series where I create the same Todo application on iOS and Android using several different systems. To see the other posts in this series, check out the first post.
Tools and Environment
Note: If you’ve already read the previous post on creating the todo app with Xamarin Forms, this section will be very familiar to you and you can skip ahead to Creating Hello World
We can develop for Xamarin on either a PC or a Mac. On PC we would use Visual Studio (I’m using Visual Studio 2017 Community) and on Mac we would use Visual Studio for Mac, both available here. For Android development, the installers for Visual Studio will install all additional dependencies, like the Android SDK, emulators, Java, etc.
In addition to Visual Studio, I would also recommend installing Android Studio. This isn’t required, especially for quick prototyping, but it has better tools for creating/managing emulators and for managing the SDK.
With all this installed, we can now start building our app!
Creating Hello World
The first thing we want to do is create our default Android and Core projects. Unfortunately, at the time of this writing there is no built-in template to do this (there used to be one that created Android, iOS, and Core, but it was removed at some point). Instead, we’re going to create our two projects manually. First we’ll create a core .NET Standard project by selecting “File->New Project” and in the dialog that appears select “Visual C# -> .NET Standard -> Class Library (.NET Standard)”, naming the project TodoXamarinNative.Core and the solution TodoXamarinNative.
Update 6/11/2018: The option now exists under “Visual C# -> Other -> Blank Cross-Platform App (Native)”. I’d still use the steps above as this template creates the Core project as a Shared Library and I prefer .NET Standard projects.

Next we’ll create our Android project and set Core as a dependency. First we right click on the Solution and select “Add -> New Project…”. In the dialog that appears we’ll select “Visual C# -> Android -> Blank App (Android)” and name the project TodoXamarinNative.Android.

To set up our dependency, right click on References under TodoXamarinNative.Android and select “Add Reference”. It should open a dialog with the Projects tab open (if not, select the Projects tab). We’ll select TodoXamarinNative.Core and click OK.

This gives us a solution with two projects: Core and Android. If we run it on both Android, we’ll see the default application.

We can see our app is up-and-running, but it’s not exactly what one would call “exciting” or “useful” yet. That’s what we’re going to do in the rest of this post!
Creating the Data Layer
Note: If you’ve already read the previous post on creating the todo app with Xamarin Native, this section will be very familiar to you and you can skip ahead to Displaying a list of Todo Items
First we’re going to create our core data layer. This is where we’ll handle CRUD operations for our todo list database. We want to create this in our Core project so we can share the code between iOS and Android with as little repetition as possible. On a more complicated app we may decide to create this layer later, but since this is very simple I want to get it out of the way so we can get into building the UI.
Our application needs to be able to do 4 things in the data layer: retrieve a list of todo Items, add items, remove items, and toggle an is completed status on an item. The first thing we need to do is define our Todo Item. Right click on TodoXamarinForms.Core and select “Add->Class”. Name the class TodoItem.cs and add three properties: Id, Title and IsCompleted.
namespace TodoXamarinNative.Core
{
    public class TodoItem
    {
        public int Id { get; set; }
        public string Title { get; set; }
        public bool IsCompleted { get; set; }
    }
}
Next we’ll create a repository class called TodoRepository with empty methods for our CRUD actions. We’ll return Tasks from the methods so we can perform our data access off of the main thread
using System;
using System.Collections.Generic;
using System.Threading.Tasks;

namespace TodoXamarinNative.Core
{
    public class TodoRepository
    {
        public Task<List<TodoItem>> GetList()
        {
            throw new NotImplementedException();
        }

        public Task DeleteItem(TodoItem itemToDelete)
        {
            throw new NotImplementedException();
        }

        public Task ChangeItemIsCompleted(TodoItem itemToChange)
        {
            throw new NotImplementedException();
        }

        public Task AddItem(TodoItem itemToAdd)
        {
            throw new NotImplementedException();
        }
    }
}
That sets up our methods for the data layer, but obviously doesn’t do anything yet. We’re going to use Sqlite as our database library so we can persist our todo list across application and device restarts. First off we need to install the sqlite-net-pcl package from nuget. Right click on the solution and select ‘Manage NuGet Packages for Solution’. Search for sqlite-net-pcl and install it on both of our projects. Make sure to install the correct package as there are many similarly named ones.

Now we need to update our TodoItem to play nicely with the database. We want to tell sqlite that our Id property is the primary key and that it should auto-increment. We can do this with a couple of attributes
using SQLite;

namespace TodoXamarinNative.Core
{
    public class TodoItem
    {
        [PrimaryKey, AutoIncrement]
        public int Id { get; set; }
...
Next we need to implement our TodoRepository. This is going to be a naive implementation that expects to be run as a single instance. There are several things we need to do here, the first of which is we’ll create a constructor that accepts a string parameter for the database file location. We need the parameter because Android and iOS have different preferred storage paths and we’ll eventually expand this app to support both OSs.
using SQLite;
using System;
using System.Collections.Generic;
using System.Threading.Tasks;

namespace TodoXamarinNative.Core
{
    public class TodoRepository
    {
        private readonly SQLiteAsyncConnection _database;

        public TodoRepository(string databaseFilePath)
        {
            _database = new SQLiteAsyncConnection(databaseFilePath);
            _database.CreateTableAsync<TodoItem>().Wait();
        }
...
We’ll also create a ‘seed’ list of TODO items to display if the user hasn’t entered any data. This is useful for development, but we’d want to remove it later if we were going to deploy this app.
...
private List<TodoItem> _seedTodoList = new List<TodoItem>
{
    new TodoItem { Title = "Create First Todo", IsCompleted = true},
    new TodoItem { Title = "Run a Marathon"},
    new TodoItem { Title = "Create TodoXamarinForms blog post"},
};
...
Finally we want to actually implement our CRUD methods. This is fairly straightforward with Sqlite
...
public async Task<List<TodoItem>> GetList()
{
    if ((await _database.Table<TodoItem>().CountAsync() == 0))
    {
        await _database.InsertAllAsync(_seedTodoList);
    }

    return await _database.Table<TodoItem>().ToListAsync();
}

public Task DeleteItem(TodoItem itemToDelete)
{
    return _database.DeleteAsync(itemToDelete);
}

public Task ChangeItemIsCompleted(TodoItem itemToChange)
{
    itemToChange.IsCompleted = !itemToChange.IsCompleted;
    return _database.UpdateAsync(itemToChange);
}

public Task AddItem(TodoItem itemToAdd)
{
    return _database.InsertAsync(itemToAdd);
}
...
The last thing we need to do is instanciate this repository in our Android project. To do this we’ll override OnCreate in MainApplication.cs.
...
public static TodoRepository TodoRepository;
...
public override void OnCreate()
{
    base.OnCreate();
    RegisterActivityLifecycleCallbacks(this);
    //A great place to initialize Xamarin.Insights and Dependency Services!

    string path = System.Environment.GetFolderPath(System.Environment.SpecialFolder.Personal);
    var repositoryFilePath = Path.Combine(path, "TodoRepository.db3");
    TodoRepository = new TodoRepository(repositoryFilePath);
}
...
Displaying a list of Todo Items
Now that we’ve finished our data layer, it’s time to actually show something to the user! At this point we’ll be developing directly in the Android project instead of in Core. This is because Xamarin Native only shares core logic, and leaves the UI code to each OS project. It leads to less code sharing than something like Xamarin Forms, but also makes it easier to customize the UI and make it follow platform standards more closely.
Note: Most real apps will have a much larger percentage of shared code than this example does. There will often be much more application logic than a single CRUD table, so Xamarin’s code-sharing will become more advantageous.
We’ll start by displaying a simple list of our Todo Items without any user interaction.
Android UIs generally created using a minimum of 2 files per screen: an Activity (where our behavior) and a Layout (where we’ll define the UI). Conveniently, the project template created each of these for us: MainActivity.cs and Resources\layout\Main.axml.
We’ll start by opening Main.axml. Visual Studio will default to a designer view, with a tab to switch to the source view. We could work in the designer, however I find the source much easier to work with so that’s what we’ll use on this post. We’ll add a new ListView to our layout.
Note: For most real applications you should prefer a RecyclerView to a ListView. The RecyclerView handles long lists much more efficiently, but we’re using a ListView to keep this example simple. You can read about the RecyclerView here
<?xml version="1.0" encoding="utf-8"?>
<LinearLayout xmlns:android="http://schemas.android.com/apk/res/android"
    android:orientation="vertical"
    android:layout_width="match_parent"
    android:layout_height="match_parent">
  <ListView
    android:id="@+id/TodoList"
    android:layout_width="match_parent"
    android:layout_height="match_parent">
  </ListView>
</LinearLayout>
You might notice some weird syntax in there where we set the id to “@+id/…”. This is Android specific syntax that tells the system to add our id to the Resource.Id enumeration so we can use it in our activity code
This sets up our layout, but doesn’t display any data. To do that we’ll edit MainActivity.cs. We need to retrieve our todo list from the repository and create an Adapter for our ListView to use.
using Android.App;
using Android.Widget;
using Android.OS;
using GoogleAndroid = Android;
using System.Linq;

namespace TodoXamarinNative.Android
{
    [Activity(Label = "TodoXamarinNative.Android", MainLauncher = true)]
    public class MainActivity : Activity
    {
        private ListView _todoListView;

        protected override void OnCreate(Bundle savedInstanceState)
        {
            base.OnCreate(savedInstanceState);

            // Set our view from the "main" layout resource
            SetContentView(Resource.Layout.Main);
            _todoListView = FindViewById<ListView>(Resource.Id.TodoList);
        }

        protected override async void OnResume()
        {
            base.OnResume();

            var todoList = await MainApplication.TodoRepository.GetList();
            var adapter = new ArrayAdapter<string>(this, GoogleAndroid.Resource.Layout.SimpleListItem1, todoList.Select(t => t.Title).ToArray());
            _todoListView.Adapter = adapter;
        }
    }
}
Now when we run the application, we can see our list items!

This is a good start, but we should probably show the user which items have been completed. To do this, we’re going to create a custom layout for our Todo Items that has a checkbox for the Completed status. Right now this will just display the status, but later we’ll use it for changing the IsCompleted property.
First we need to create a new layout for our todo item. Right click on “Resources/layout” and select “Add -> New Item”. In the resulting dialog we’ll pick “Android Layout” and name it TodoListItem. When the file opens, switch to the source view. We’re going to change the linear layout to a horizontal orientation and add a new TextView and CheckBox.
<?xml version="1.0" encoding="utf-8"?>\
<LinearLayout xmlns:android="http://schemas.android.com/apk/res/android"
    android:orientation="horizontal"
    android:layout_width="match_parent"
    android:layout_height="wrap_content">
    <TextView
        android:id="@+id/TodoTitle"
        android:layout_width="0dp"
        android:layout_height="wrap_content"
        android:layout_weight="1"/>
    <CheckBox
        android:id="@+id/TodoIsCompleted"
        android:layout_width="wrap_content"
        android:layout_height="wrap_content" />
</LinearLayout>
One interesting piece of code in this section is on our TextView where we set the layout_width to 0dp and the layout_weight to 1. This tells the TextView to fill any horizontal space not already used by other elements and pushes our CheckBox to the right side of the screen.
Next we need to create our own custom adapter to use this layout. There’s a helpful template we can use that sets up a lot of the code for us. Right click on TodoXamarinNative.Android and select “Add -> New Item”. In the dialog that appears, select the Adapter template and name it TodoAdapter. This creates a basic Adapter that implements the ViewHolder pattern. We won’t go into detail about it here, but this pattern allows Android to make efficient use of memory in ListViews.
We’ll make a few changes to our adapter. First we’ll accept a List
using System.Collections.Generic;
using Android.Content;
using Android.Runtime;
using Android.Views;
using Android.Widget;
using TodoXamarinNative.Core;

namespace TodoXamarinNative.Android
{
    class TodoAdapter : BaseAdapter
    {
        Context context;
        private List<TodoItem> _todoItems;

        public TodoAdapter(Context context, List<TodoItem> todoItems)
        {
            this.context = context;
            _todoItems = todoItems;
        }

        public override Java.Lang.Object GetItem(int position)
        {
            return position;
        }

        public override long GetItemId(int position)
        {
            return position;
        }

        public override View GetView(int position, View convertView, ViewGroup parent)
        {
            var view = convertView;
            TodoAdapterViewHolder holder = null;

            if (view != null)
                holder = view.Tag as TodoAdapterViewHolder;

            if (holder == null)
            {
                holder = new TodoAdapterViewHolder();
                var inflater = context.GetSystemService(Context.LayoutInflaterService).JavaCast<LayoutInflater>();

                view = inflater.Inflate(Resource.Layout.TodoListItem, parent, false);
                holder.Title = view.FindViewById<TextView>(Resource.Id.TodoTitle);
                holder.IsCompleted = view.FindViewById<CheckBox>(Resource.Id.TodoIsCompleted);
                view.Tag = holder;
            }

            var currentTodoItem = _todoItems[position];
            holder.Title.Text = currentTodoItem.Title;
            holder.IsCompleted.Checked = currentTodoItem.IsCompleted;

            return view;
        }

        public override int Count
        {
            get
            {
                return _todoItems.Count;
            }
        }

    }

    class TodoAdapterViewHolder : Java.Lang.Object
    {
        public TextView Title { get; set; }
        public CheckBox IsCompleted { get; set; }
    }
}
Finally we need to tell our ListView to use our new adapter. This is a fairly simple update to our OnResume method in MainActivity.
...
var todoList = await MainApplication.TodoRepository.GetList();
var adapter = new TodoAdapter(this, todoList.OrderBy(t => t.IsCompleted).ToList());
_todoListView.Adapter = adapter;
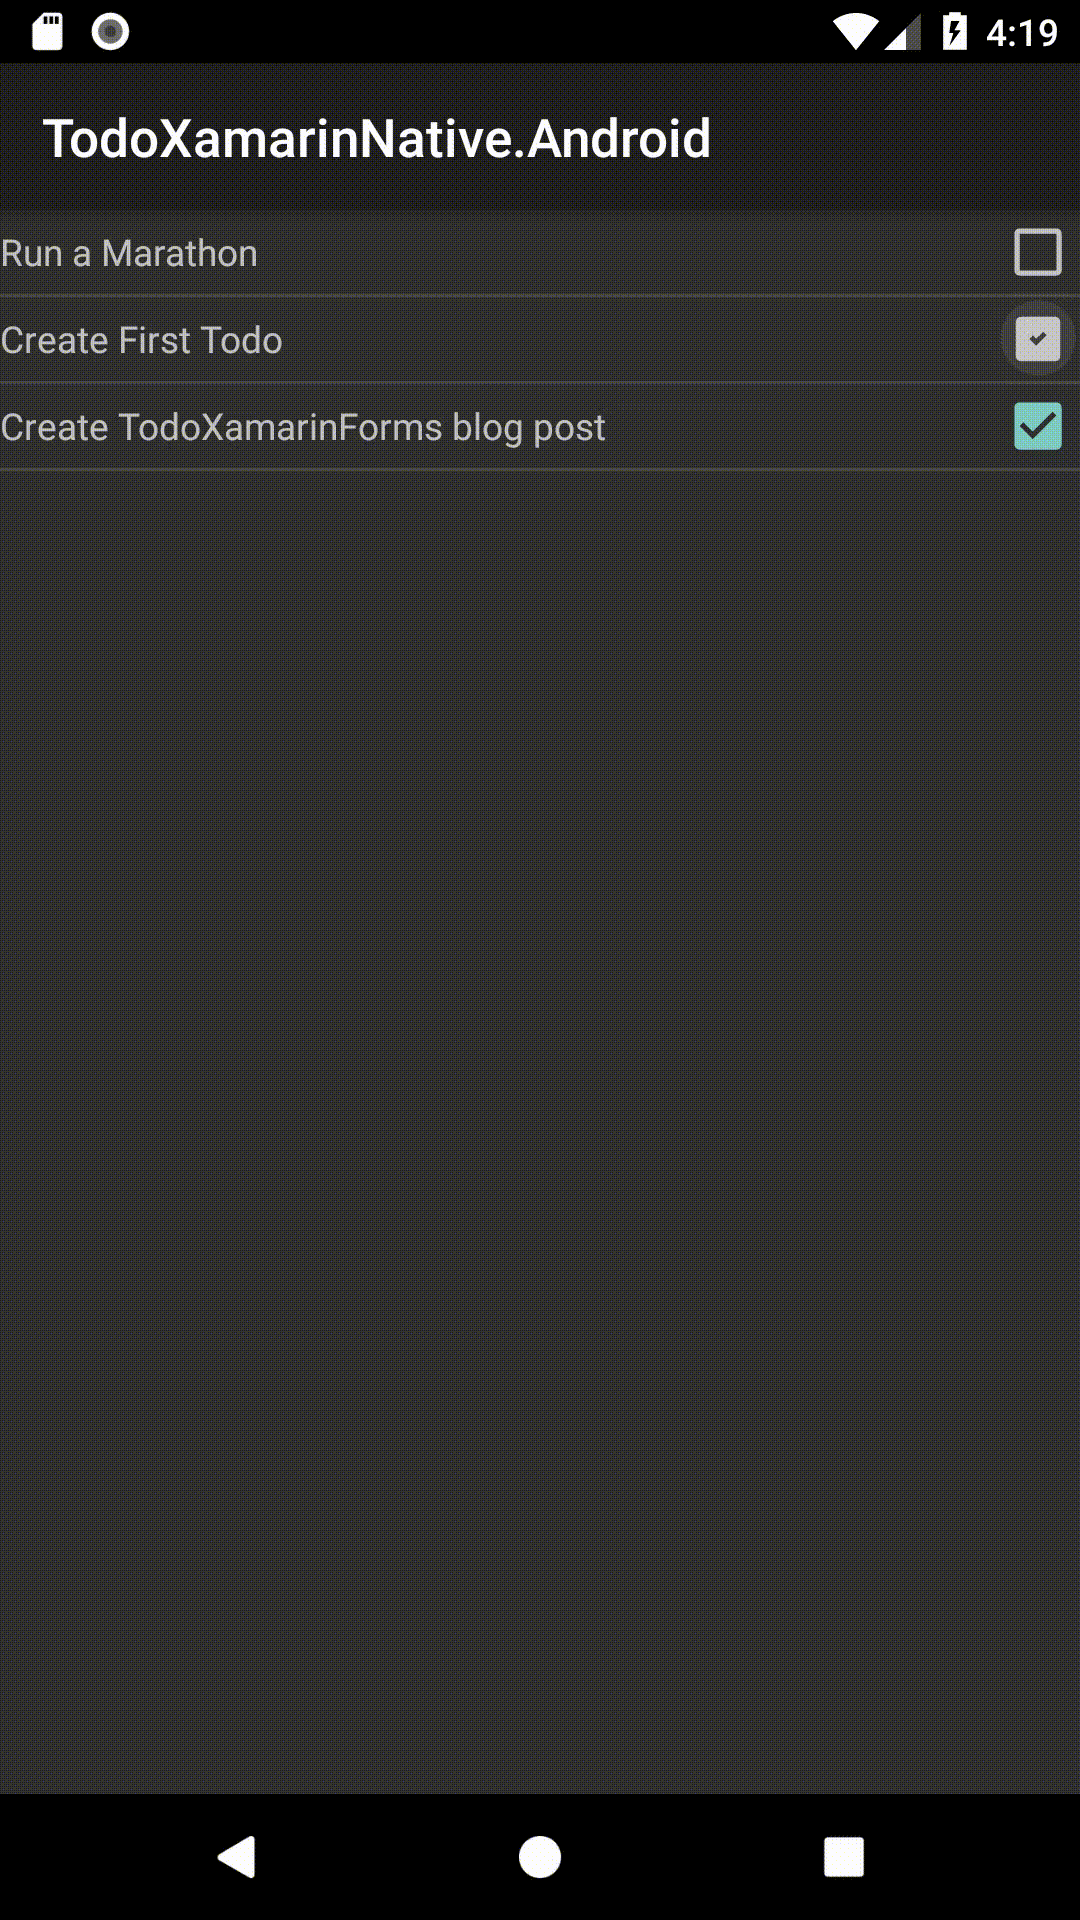
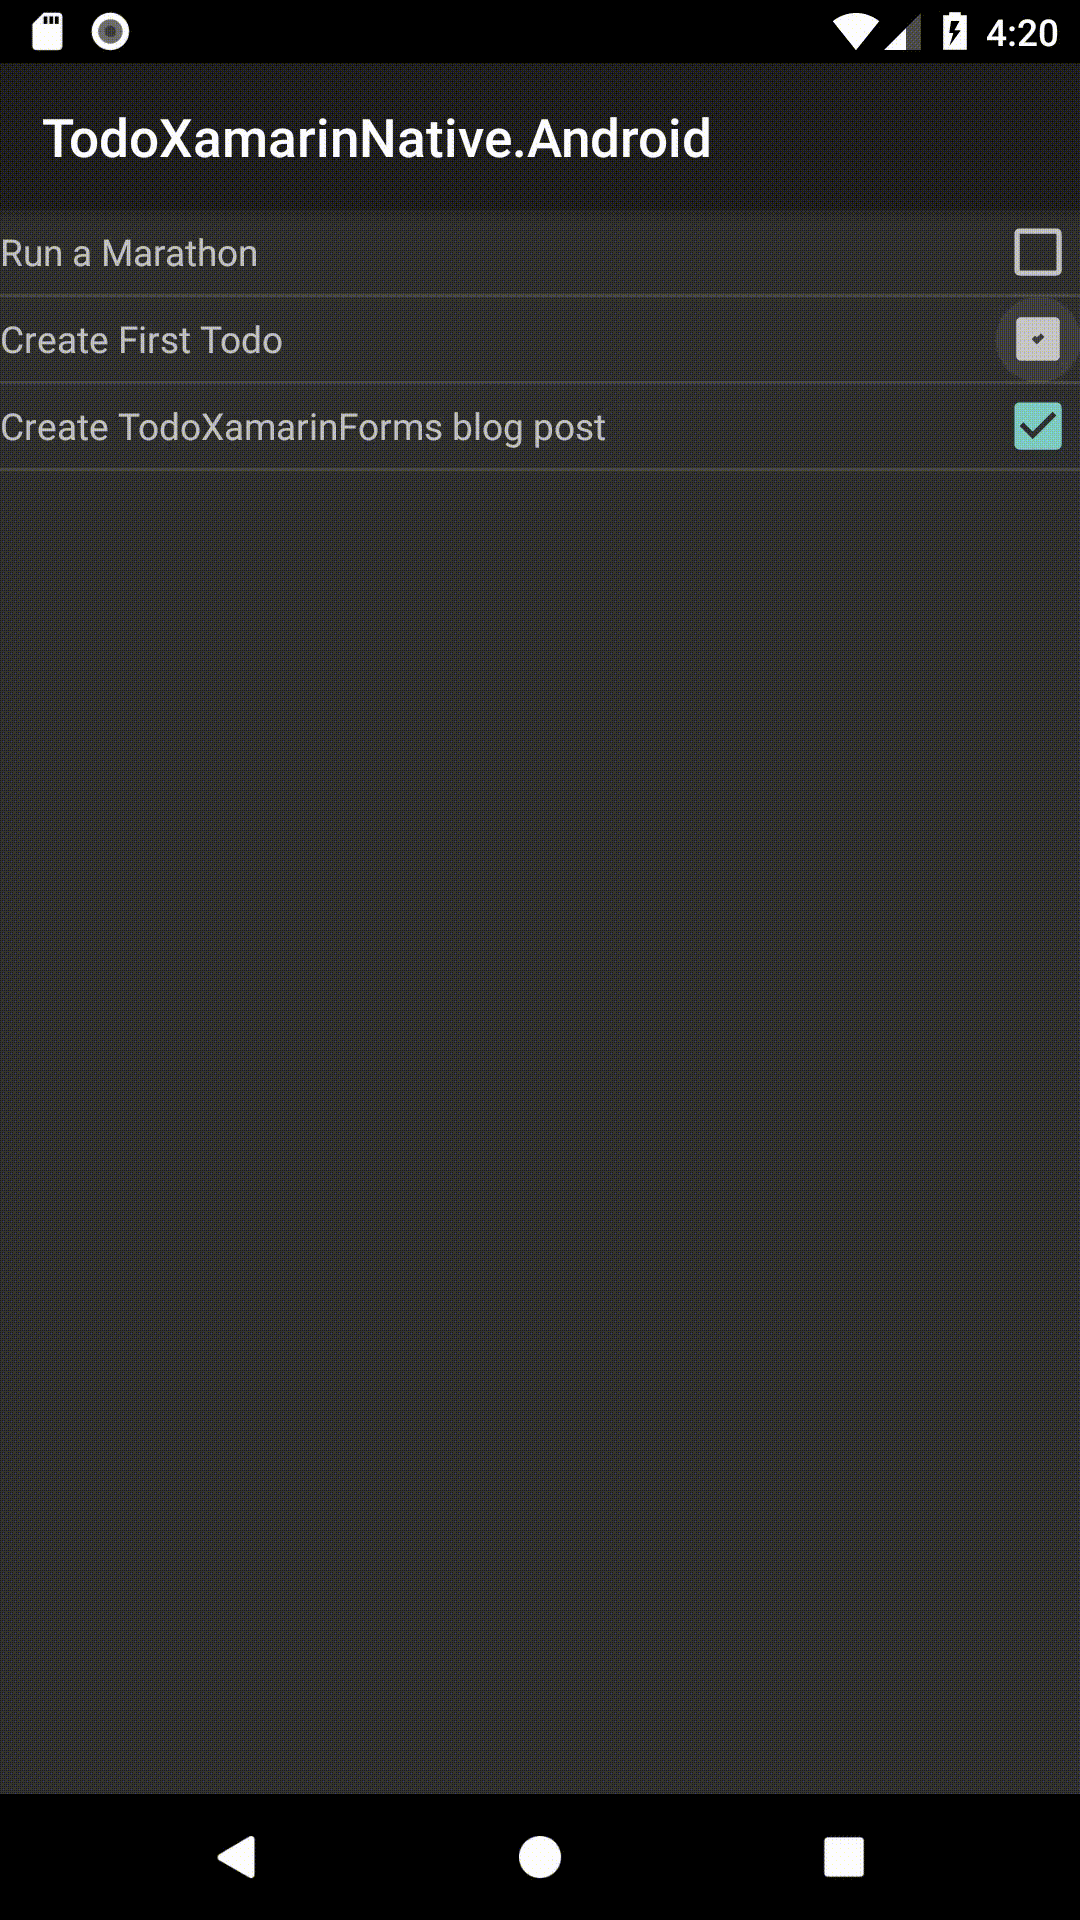
...Now when we run the application we’ll see our list with checkboxes showing the completed status of each task.

With that done, we should allow the user to start interacting with our list.
Completing, Uncompleting, and Deleting Items
We’re going to start by implementing actions that the user can take without leaving the main screen: Completing, Uncompleting, and Deleting items. Much like displaying the items, this involves platform specific code to wire up.
We’ll start with Completing and Uncompleting tasks since we already have a CheckBox control to interact with. The first thing we need to do is update our TodoAdapter to raise an event when the user clicks a checkbox. We need to create an EventHandler called OnCompletedChanged and a method called IsCompleted_CheckedChange that calls the handler.
class TodoAdapter : BaseAdapter
{
    Context context;
    private List<TodoItem> _todoItems;
    public EventHandler<int> OnCompletedChanged;
...
public override View GetView(int position, View convertView, ViewGroup parent)
{
    ...
    holder.IsCompleted.Checked = currentTodoItem.IsCompleted;
    holder.IsCompleted.Tag = currentTodoItem.Id;
    holder.IsCompleted.CheckedChange -= IsCompleted_CheckedChange;
    holder.IsCompleted.CheckedChange += IsCompleted_CheckedChange;

    return view;
}
...
private void IsCompleted_CheckedChange(object sender, CompoundButton.CheckedChangeEventArgs e)
{
    var id = (int)((View)sender).Tag;
    OnCompletedChanged?.Invoke(sender, id);
}
We’re using the ‘Tag’ property of the CheckBox to store our TodoItem’s Id so we can pass it to the EventHandler
Next we need to update our MainActivity to respond to OnCompletedChanged. To do this, we’ll also need to store our todo list in a private field.
...
public class MainActivity : Activity
{
    private ListView _todoListView;
    private List<TodoItem> _todoList;
...
protected override async void OnResume()
{
    base.OnResume();

    await UpdateTodoList();
}

private async Task UpdateTodoList()
{
    _todoList = await MainApplication.TodoRepository.GetList();
    var adapter = new TodoAdapter(this, _todoList.OrderBy(t => t.IsCompleted).ToList());
    adapter.OnCompletedChanged += HandleItemCompletedChanged;
    _todoListView.Adapter = adapter;
}

private async void HandleItemCompletedChanged(object sender, int todoId)
{
    var targetItem = _todoList.Single(t => t.Id == todoId);
    await MainApplication.TodoRepository.ChangeItemIsCompleted(targetItem);
    await UpdateTodoList();
}
Now when we run the application, we can see our list updating when the user clicks an item’s checkbox.
Next we want to allow the user to delete an item from the list. Conveniently, Android ListViews have a built-in context menu we can call when the user long presses an item. First thing we’ll do is display the menu with a “delete” button.
We need to adjust our MainActivity to do two things: register our listview for a context menu, and implement an override for OnCreateContextMenu where we set our items. We might be tempted to handle registration in the constructor, thinking that we only want to do that once, however we want to register after the adapter is set in OnResume so Android knows what items need to be handled.
    ...
    _todoListView.Adapter = adapter;
    RegisterForContextMenu(_todoListView);
}
...
public override void OnCreateContextMenu(IContextMenu menu, View v, IContextMenuContextMenuInfo menuInfo)
{
    base.OnCreateContextMenu(menu, v, menuInfo);
    if (v.Id == _todoListView.Id)
    {
        AdapterContextMenuInfo info = (AdapterContextMenuInfo)menuInfo;
        var item = _todoList.Single(t => t.Id == _todoListView.Adapter.GetItemId(info.Position));
        var title = item.Title;
        menu.SetHeaderTitle(title);

        menu.Add("Delete");
    }
}
If we try to run the app now, we won’t see the context menu that we expect. This is because we need to make a couple changes in our adapter to support this. First we need to enable long press on our view, and second we need to actually implement the GetItemId method that we’re calling in OnCreateContextMenu.
...
public override long GetItemId(int position)
{
    return _todoItems[position].Id;
}
...
public override View GetView(int position, View convertView, ViewGroup parent)
{
    ...
    view = inflater.Inflate(Resource.Layout.TodoListItem, parent, false);
    view.LongClickable = true;
Now we’ll see a context menu with our item’s title and a Delete button when the user long presses on a todo item.

Finally we should implement the delete button. For this we’ll override the OnContextItemSelected method in MainActivity, making it remove the selected item from the database and refresh our list.
public override bool OnContextItemSelected(IMenuItem menuItem)
{
    switch (menuItem.GroupId)
    {
        case 0:
            var info = (AdapterContextMenuInfo)menuItem.MenuInfo;
            var item = _todoList.Single(t => t.Id == _todoListView.Adapter.GetItemId(info.Position));
            MainApplication.TodoRepository.DeleteItem(item)
                .ContinueWith(_ =>
                {
                    RunOnUiThread(async () =>
                    {
                        await UpdateTodoList();
                    });
                });
            return true;
        default:
            return base.OnContextItemSelected(menuItem);
    }
}
There are a few interesting things to look at here.
- We used a ContinueWith instead of an await. We did this because the base OnContextItemSelected method expects to return a bool, so we can’t adjust it to be an async function.
- We used a method we haven’t seen before: RunOnUiThread. This marshalls the action back to the UI thread, and is required when you need to make a visual change from a background thread. In our case, we’re updating the ListView’s adapter
- Our switch statement is currently hard-coded to expect ‘delete’ to be in the 0th position. This is not a good idea in more complex apps, since future developers can add or re-arrange context items. There are better ways to handle this, but they’re beyond what I want to get into for this post.
With that implemented, we can run the app and see that our item deletion works!
Adding Todo Items
Our app is doing pretty well at this point, but we’re missing one very important feature: adding new todo items! We’re going to add a button to our todo list screen and create a new screen where the user can enter their item. Following the pattern of the previous two sections, this will involve solely OS specific code.
The first thing we want to do is create an “Add Todo Item” button for the user to click. We’ll do this by editing our Main.axml layout file.
...
    <ListView
        android:id="@+id/TodoList"
        android:layout_width="match_parent"
        android:layout_height="0dp"
        android:layout_weight="1"/>
    <Button
        android:id="@+id/AddNewItem"
        android:layout_width="match_parent"
        android:layout_height="wrap_content"/>
</LinearLayout>
This adds our new button to the bottom of our screen. Notice we used the “layout_weight” attribute again on the ListView to tell it to consume all available space.

Before we implement the buttons functionality, we should create a new screen for it to navigate to. We’ll add a new Activity to TodoXamarinNative.Android called “AddTodoItemActivity” and a new layout to Resources/layout called “AddTodoItem”. Our layout will contain an EditText and two Buttons (Cancel and Save), and we’ll tell AddTodoItemActivity to use our layout in the OnCreate method.
<?xml version="1.0" encoding="utf-8"?>
<LinearLayout xmlns:android="http://schemas.android.com/apk/res/android"
    android:orientation="vertical"
    android:layout_width="match_parent"
    android:layout_height="match_parent"
    android:gravity="center">
  <EditText
    android:id="@+id/TodoTitle"
    android:layout_width="match_parent"
    android:layout_height="wrap_content"/>
  <LinearLayout
    android:orientation="horizontal"
    android:layout_width="match_parent"
    android:layout_height="wrap_content">
    <Button
      android:id="@+id/CancelButton"
      android:text="Cancel"
      android:layout_width="0dp"
      android:layout_height="wrap_content"
      android:layout_weight="1"
      android:layout_marginLeft="5dp"
      android:layout_marginRight="5dp"/>
    <Button
      android:id="@+id/SaveButton"
      android:text="Save"
      android:layout_width="0dp"
      android:layout_height="wrap_content"
      android:layout_weight="1"
      android:layout_marginRight="5dp"
      android:layout_marginLeft="5dp"/>
  </LinearLayout>
</LinearLayout>
using Android.App;
using Android.OS;
namespace TodoXamarinNative.Android
{
[Activity(Label = "AddTodoItemActivity")]
public class AddTodoItemActivity : Activity
{
protected override void OnCreate(Bundle savedInstanceState)
{
base.OnCreate(savedInstanceState);
SetContentView(Resource.Layout.AddTodoItem);
}
}
}We did a couple new things in our layout worth calling out. First, we used layout_weight again but a little differently than before. Instead of setting a single element to use layout_weight, we told both buttons to use the same weight. This will cause them to both expand to use half of the available space (excluding the left and right margins we set). We also set the main StackLayout’s gravity to ‘center’. This will put our controls in the center of the screen vertically.
Next we need to wire up our button and tell it to navigate to our new activity. We’ll do this in the OnCreate method in MainActivity.
protected override void OnCreate(Bundle savedInstanceState)
{
    ...
    FindViewById<Button>(Resource.Id.AddNewItem).Click +=
            (s, e) => StartActivity(new Intent(this, typeof(AddTodoItemActivity)));
}
Now when the user clicks our button, they’re taken to the AddTodoItemActivity.

Now it’s time to implement our Add Item screen. First we’ll start with the Cancel button, since that has the least amount of work to do. We’ll open AddTodoItemActivity and add a single line that calls the built in Finish method.
protected override void OnCreate(Bundle savedInstanceState)
{
    ...
    FindViewById<Button>(Resource.Id.CancelButton).Click += (s, e) => Finish();
}
Next we’ll implement the “Save” button. This has a little more work to do, but not much. We need to:
- Read the text from our EditText
- Save a new Item to the database
- Call Finish Because there are more steps, we’ll split it out into a separate method.
protected override void OnCreate(Bundle savedInstanceState)
{
    ...
    FindViewById<Button>(Resource.Id.SaveButton).Click += HandleSave;
}

private async void HandleSave(object s, EventArgs e)
{
    var todoText = FindViewById<EditText>(Resource.Id.TodoTitle).Text;
    await MainApplication.TodoRepository.AddItem(new TodoItem { Title = todoText });
    Finish();
}
With that in place, our user can add items!

That finishes our functionality on Android, but there’s one more thing we should cover before saying our app is done. You may have noticed that our screen titles aren’t very useful. Let’s fix that. If we look in both of our Activity files, there’s an Activity attribute with a Label. That label is what Android is displaying to our user, so lets set them to something more useful.
...
[Activity(Label = "Todo List", MainLauncher = true)]
public class MainActivity : Activity
...
...
[Activity(Label = "Add Todo Item")]
public class AddTodoItemActivity : Activity
...Now our screen titles are much better.


Conclusion
And there we have it! We’ve created a simple Todo application for Android using Xamarin Native and we’re ready to begin creating our iOS side. We’ll cover that in part 2 (currently being written).