
Todo in Xamarin Forms 23 Apr 2018
Today we’re going to look at creating a Todo application using Xamarin Forms. Xamarin Forms is a cross platform framework build on the .NET stack that allows for massive code re-use across platforms. It allows us to share both the application logic and the UI code between multiple target platforms (mostly). There are some exceptions for truly native behavior, of course, like Notifications and platform-specific elements like the Android Floating Action Button, but we won’t go into them today. For now let’s just get started and see what we get out of the box. Full source code for this application is available on GitHub
Note: All of my steps are using Visual Studio 2017 Community on Windows. Your mileage may vary if you work on a different edition of VS or on Visual Studio for Mac.
This post is part of a series where I create the same Todo application on iOS and Android using several different systems. To see the other posts in this series, check out the first post.
Tools and Environment
We can develop for Xamarin Forms on either a PC or a Mac. On PC we would use Visual Studio (I’m using Visual Studio 2017 Community) and on Mac we would use Visual Studio for Mac, both available here. For Android development, the installers for Visual Studio will install all additional dependencies, like the Android SDK, emulators, Java, etc. iOS setup can be a little trickier: no matter which OS you develop on, you’ll need a Mac with XCode installed. If you’re developing on a Windows machine, Visual Studio will connect to the Mac for iOS compilation. This is needed because Apple requires a Mac to compile iOS applications.
In addition to Visual Studio, I would also recommend installing Android Studio. This isn’t required, especially for quick prototyping, but it has better tools for creating/managing emulators and for managing the SDK.
With all this installed, we can now start building our app!
Creating Hello World
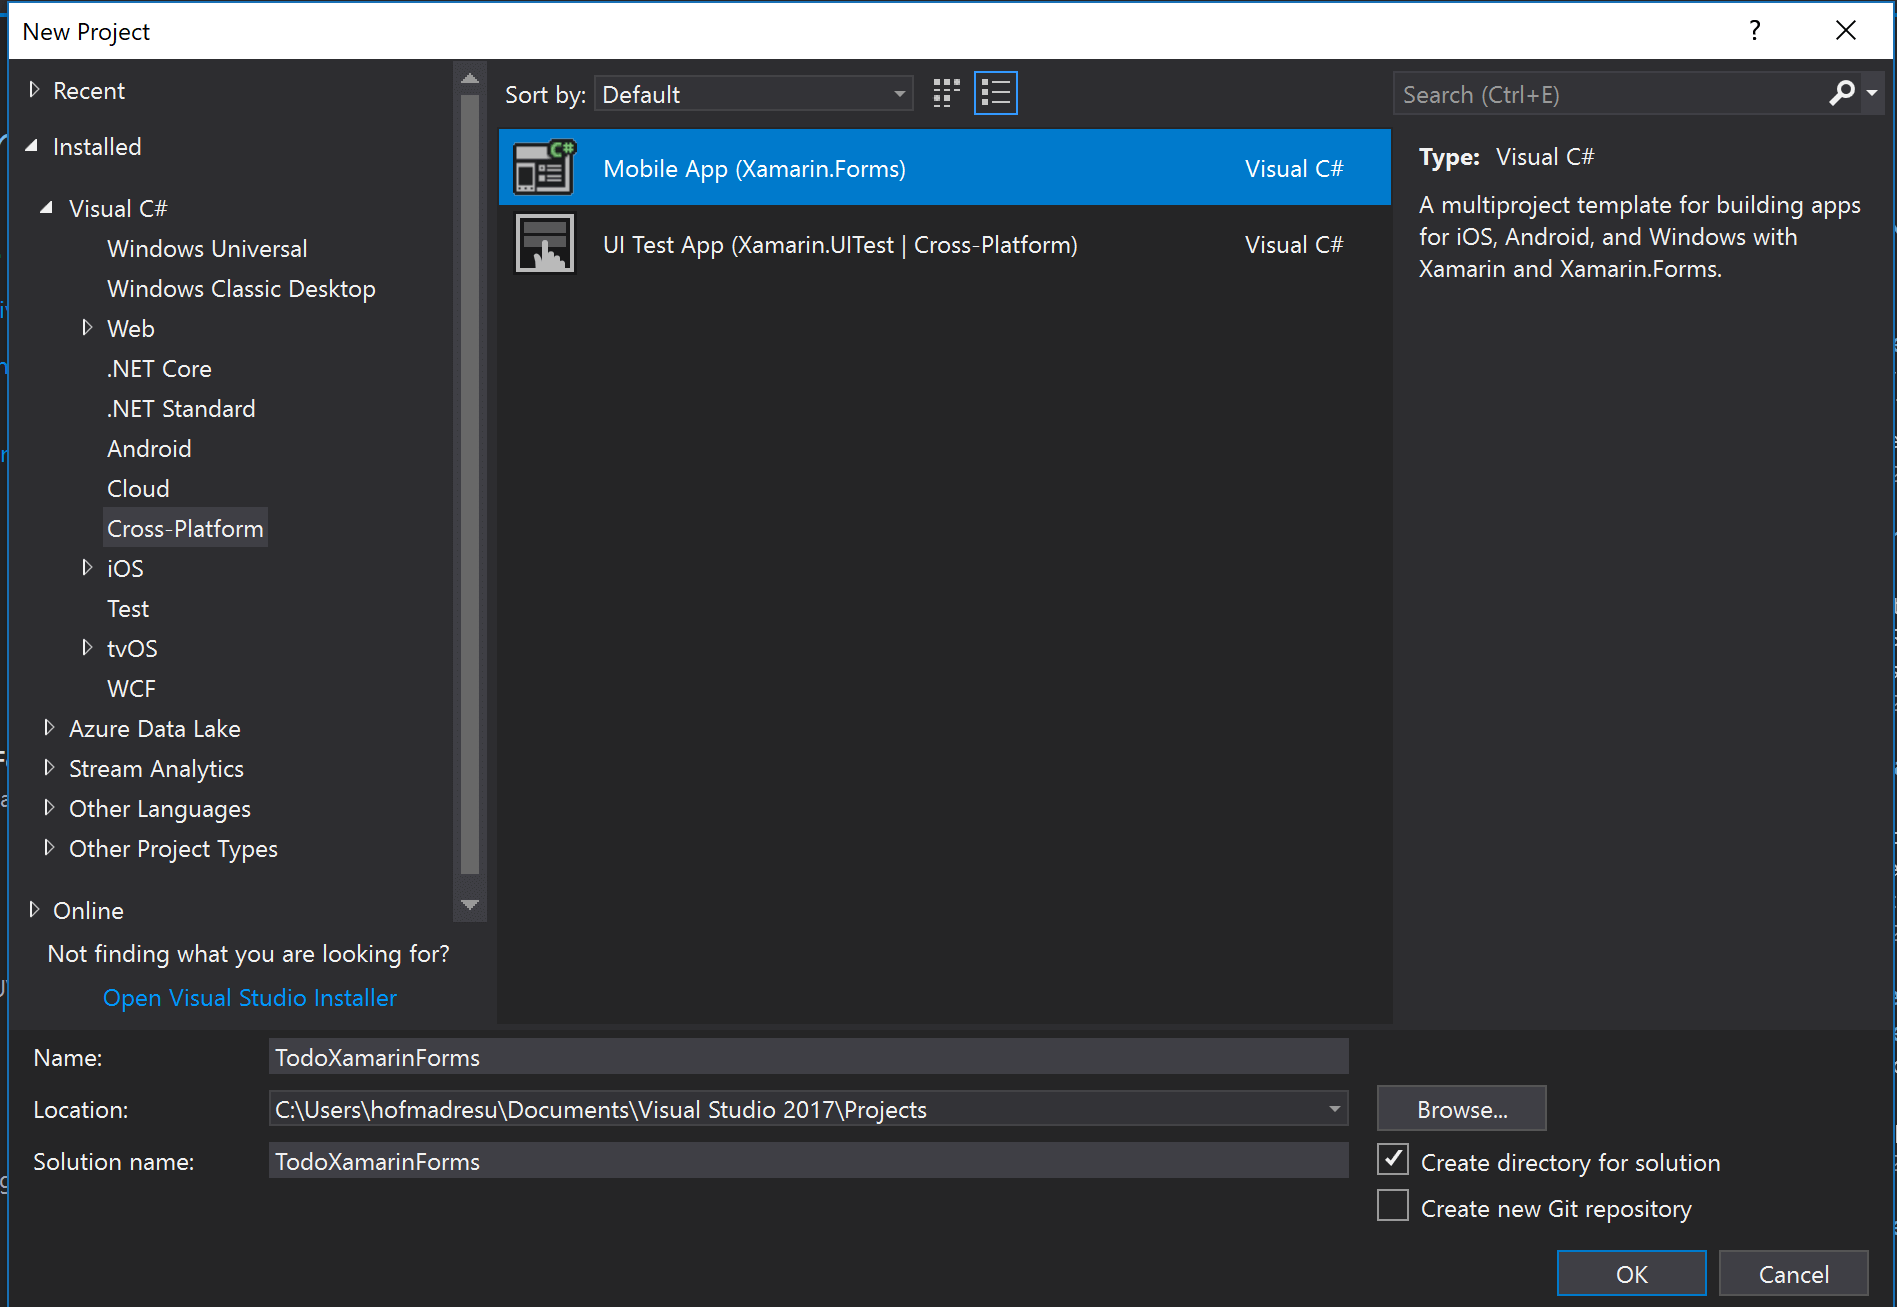
The first thing we’ll do is create a new app project and see what Xamarin Forms gives us out-of-the-box. We open Visual Studio and select File->New Project. This opens a dialog where we’ll select Installed->Visual C#->Cross-Platform->Mobile App (Xamarin.Forms) and name our solution “TodoXamarinForms”.
Next we’re asked what platforms we want to target and what type of shared project we want. We’ll deselect Windows so we only create Android and iOS projects, and we’ll select .NET Standard.

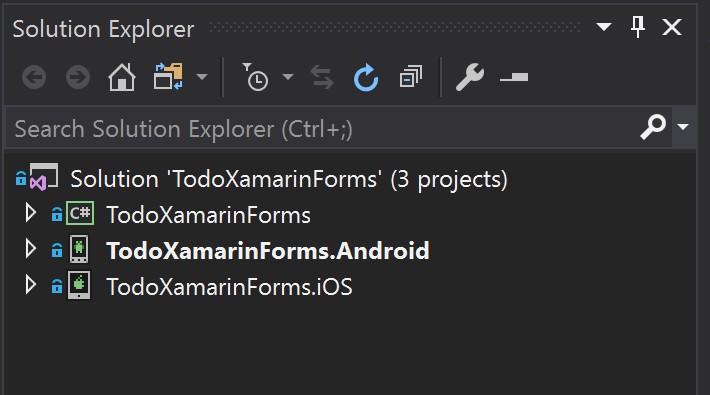
Visual Studio will create our solution with 3 projects: a .NET Standard library (TodoXamarinForms), an Android project (TodoXamarinForms.Android), and an iOS project (TodoXamarinForms.iOS).
Most of our work will be done in the .NET Standard library, with only minor ventures into the other projects for platform-specific work. Now let’s run our app and see what we have! Make sure either the iOS or Android project is set as your startup project (it should be listed in bold) and either hit the green ‘play’ button or the F5 key. This will launch your emulator (simulator if iOS) and deploy the app.


Out of the box we have a Hello World app running on both Android and iOS. It’s not very exciting yet, but this is where the real fun begins.
Displaying a list of Todo items
Xamarin Forms uses XAML for UI development, which provides access to two way databinding. Unfortunately, there is a little boilerplate code required to get this working. We’re going to use the Fody package and a base class to clean that up a little.
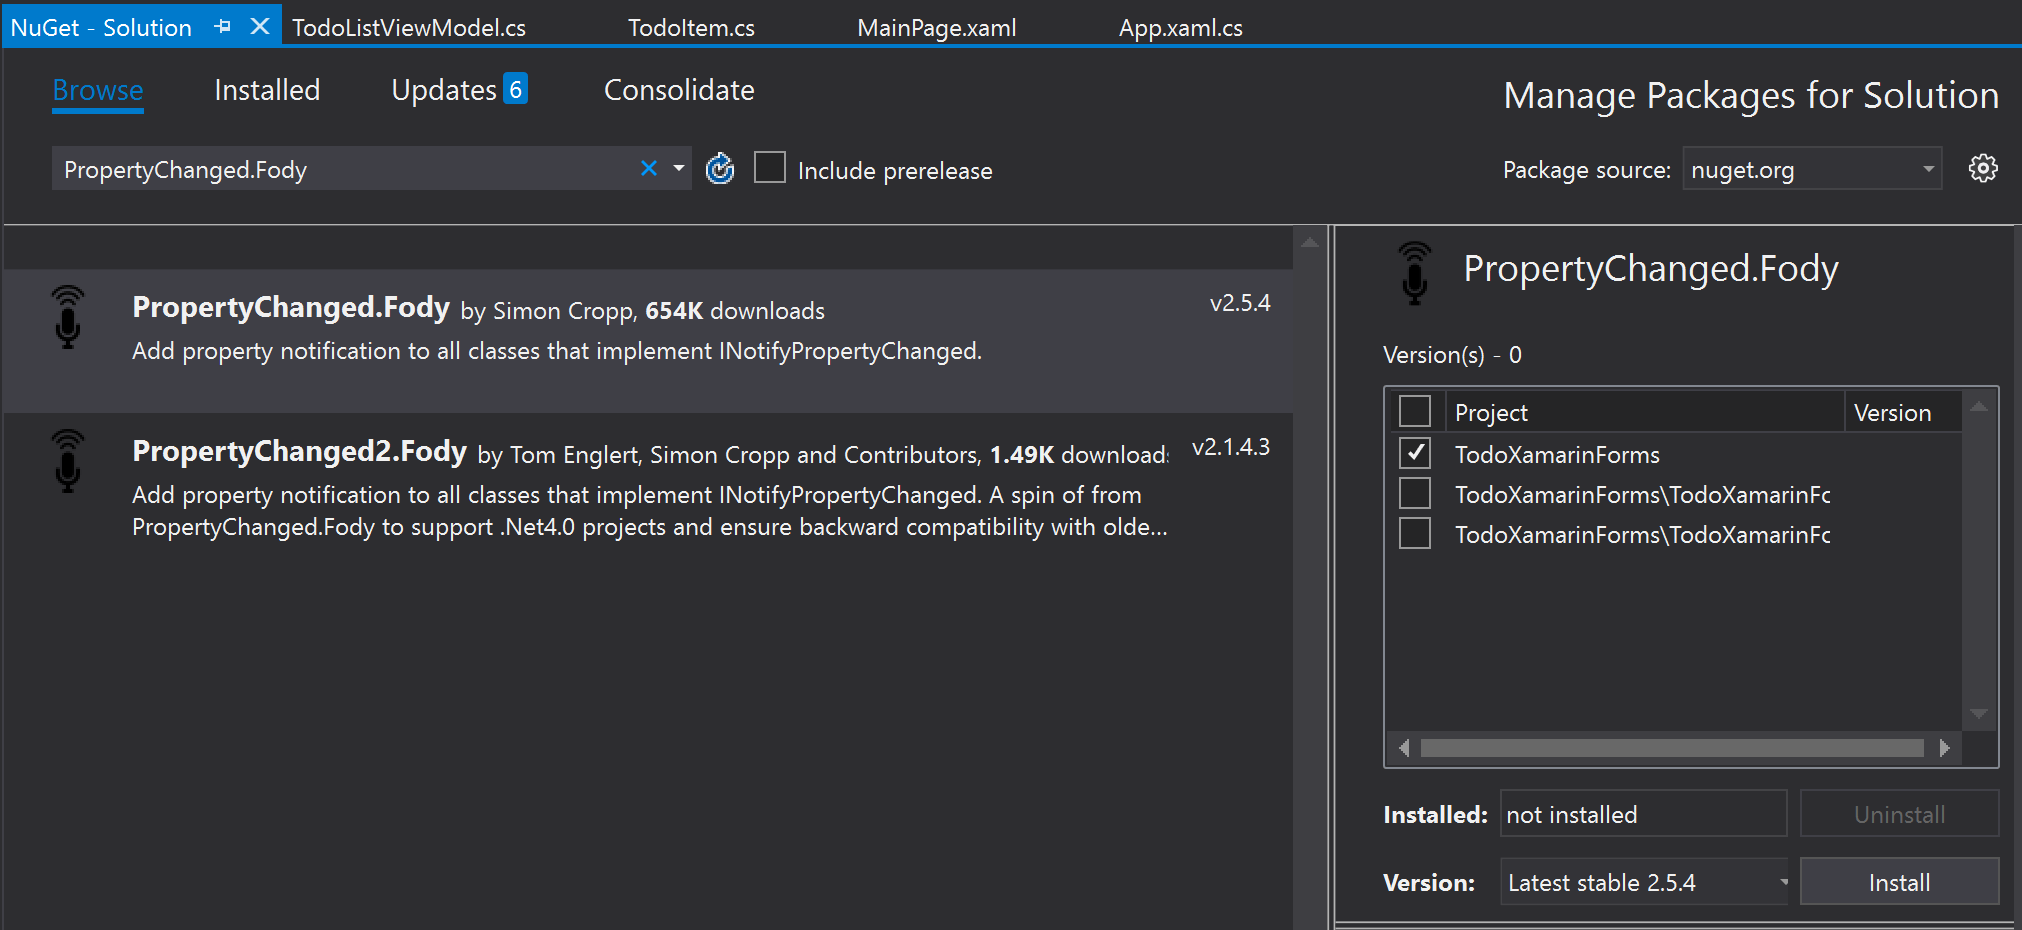
First we’ll install the Fody package. Right click on the solution and select ‘Manage NuGet Packages for Solution’. Search for PropertyChanged.Fody and install it on the .NET Standard project (reminder: the one that says neither Android nor iOS). Next we need to create a configuration XML file.
Right click on the TodoXamarinForms project and select ‘Add->New Item’. Select XML from the list and name it FodyWeavers.xml. Paste this content into the file:
<?xml version="1.0" encoding="utf-8" ?>
<Weavers>
  <PropertyChanged/>
</Weavers>
Finally we want to create a base class we’ll use to make our other classes observable. Right click on TodoXamarinForms again and select Add->Class. Name the class BaseFodyObservable.cs. In the class, implement INotifyPropertyChanged.
using System.ComponentModel;

namespace TodoXamarinForms
{
    public abstract class BaseFodyObservable : INotifyPropertyChanged
    {
#pragma warning disable CS0067
        public event PropertyChangedEventHandler PropertyChanged;
#pragma warning restore
    }
}
You may notice a couple weird looking #pragma statements in the sample code. These aren’t strictly needed, but they tell the compiler to ignore the fact that nothing directly uses the PropertyChanged event. This has no effect on the functionality of our app, but I prefer to hide this warning since we know it will be used by the Fody package.
Now that we have the boilerplate out of the way, we should is define our Todo item. Since this is a simple app, we only have 3 properties we care about for a todo: a unique id, a title, and whether or not it has been completed. For this we’ll create a new class called TodoItem.cs that is a subclass of our BaseFodyObservable. Follow the same steps used to create the BaseFodyObservable file and add the following content:
namespace TodoXamarinForms
{
    public class TodoItem : BaseFodyObservable
    {
        public int Id { get; set; }
        public string Title { get; set; }
        public bool IsCompleted { get; set; }
    }
}
Now it’s time to start looking at the data we want to show on our landing screen. To start with, we want to display a title at the top of the screen and show a list of our todo items. We’ll create a view model called TodoListViewModel that holds this data. Don’t forget to make this a subclass of BaseFodyObservable as well.
using System.Collections.ObjectModel;

namespace TodoXamarinForms
{
    public class TodoListViewModel : BaseFodyObservable
    {
        public string Title => "My Todo List";
        public ObservableCollection<TodoItem> TodoList { get; set; }
    }
}
The final thing we want to do for now is to create a default list of Todo items so we have something to display. We’ll start by hard-coding a few items.
...
public ObservableCollection<TodoItem> TodoList { get; set; } = new ObservableCollection<TodoItem>
{
    new TodoItem { Id = 0, Title = "Create First Todo", IsCompleted = true},
    new TodoItem { Id = 1, Title = "Run a Marathon"},
    new TodoItem { Id = 2, Title = "Create TodoXamarinForms blog post"},
};
...
Now we want to create our list screen and bind it to the data we created above. We could just edit the MainPage.xaml file that was created for us, however I don’t like that name so we’re going to create our own. Right click on the TodoXamarinForms project and select ‘Add->New Item’. From here select ‘Xamarin.Forms->Content Page’ and name it TodoListView. This creates a new XAML page with a C# code behind, but we still need to tell it to use our View Model. Open TodoListView.xaml.cs and in the constructor set BindingContext to a new instance of TodoListViewModel.
using Xamarin.Forms;
using Xamarin.Forms.Xaml;

namespace TodoXamarinForms
{
    [XamlCompilation(XamlCompilationOptions.Compile)]
    public partial class TodoListView : ContentPage
    {
        public TodoListView ()
        {
            InitializeComponent ();
            BindingContext = new TodoListViewModel();
        }
    }
}
Next we’ll create our UI and bind it to the data in our View Model. For now this will just be a simple screen that displays our list of Todo items. Open TodoList.xaml and delete everything from within the ContentPage.Content tag. Replace it with a ListView and bind the data from our View Model. We should also set the page title and bind it to our View Model.
<?xml version="1.0" encoding="utf-8" ?>
<ContentPage xmlns="http://xamarin.com/schemas/2014/forms"
             xmlns:x="http://schemas.microsoft.com/winfx/2009/xaml"
             x:Class="TodoXamarinForms.TodoListView"
             Title="{Binding Title}">
    <ContentPage.Content>
        <ListView ItemsSource="{Binding TodoList}">

        </ListView>
    </ContentPage.Content>
</ContentPage>
If we try to run the app now we’ll still see the Hello World screen from the initial project creation, and we may ask “What’s going on?”. This is because we have one step remaining: we need to tell our app to start on our new screen. Open App.xaml.cs and replace the MainPage line with
...
MainPage = new NavigationPage(new TodoListView());
...
This line does a couple things. The most obvious portion is that it instantiates our TodoListView and sets the MainPage of our application. We also wrapped our View in a new instance of NavigationPage. This does a couple things for us: it handles the iOS Safe Area and sets up the structure we’ll use for navigation later in the app.
Now when we run the app, we see our new screen with a title and a list of “TodoXamarinForms.TodoItem”. This isn’t quite what we want, as it’d be much more useful to show the TodoItem’s Title.


To show our TodoItems’s Title, we’re going to use a built in control called TextCell. There are many other controls we could use if we wanted a different layout, but for our simple app TextCell is more than sufficient. Open TodoListView.xaml and add the new TextCell to the ListView tag, binding the Text attribute to your Title property. Since this is in the context of our ListView, this binds to the individual TodoItem’s Title property.
...
<ListView ItemsSource="{Binding TodoList}">
    <ListView.ItemTemplate>
        <DataTemplate>
            <TextCell Text="{Binding Title}" />
        </DataTemplate>
    </ListView.ItemTemplate>
</ListView>
...
If we run the app now, we’ll see our todo item titles listed on the screen


There’s one more thing we’d like to display for our todo list: whether-or-not we have completed to item! For this we’re going to group our todos based on their IsCompleted property and show them in either a Active or Completed section. The Xamarin Forms ListView we’re using has grouping built-in, so all we have to do is adjust our datastructure and bindings to handle groups.
For ListView to display groups, we need to tell it what groups are available and which group each item belongs to. We’re going to use a couple very useful LINQ methods to do this in our View Model.
using System.Collections.Generic;
using System.Linq;

namespace TodoXamarinForms
{
    class TodoListViewModel : BaseFodyObservable
    {
        public TodoListViewModel()
        {
            GroupedTodoList = GetGroupedTodoList();
        }

        public ILookup<string, TodoItem> GroupedTodoList { get; set; }
        public string Title => "My Todo list";

        private List<TodoItem> _todoList = new List<TodoItem>
        {
            new TodoItem { Id = 0, Title = "Create First Todo", IsCompleted = true},
            new TodoItem { Id = 1, Title = "Run a Marathon"},
            new TodoItem { Id = 2, Title = "Create TodoXamarinForms blog post"},
        };

        private ILookup<string, TodoItem> GetGroupedTodoList()
        {
            return _todoList.OrderBy(t => t.IsCompleted)
                            .ToLookup(t => t.IsCompleted? "Completed" : "Active");
        }
    }
}
We did a few things to set this up. First we created a new property for GroupedTodoList. This is what we’ll bind our ListView to in the next step. Then we changed our TodoList property into a private field and changed the type to List. Since we won’t be binding directly to the un-grouped list, we don’t need any of the extra cruft for Observable or a property and we can clean it up now. Next we created a helper method that translates our todo list into a grouped todo list and called it in our View Model’s constructor.
Next we need to bind our ListView to the new data. We will make 3 changes for this: set our ItemSource to GroupedTodoList, enable grouping and set our group display binding.
...
<ListView ItemsSource="{Binding GroupedTodoList}"
IsGroupingEnabled="True"
GroupDisplayBinding="{Binding Key}">
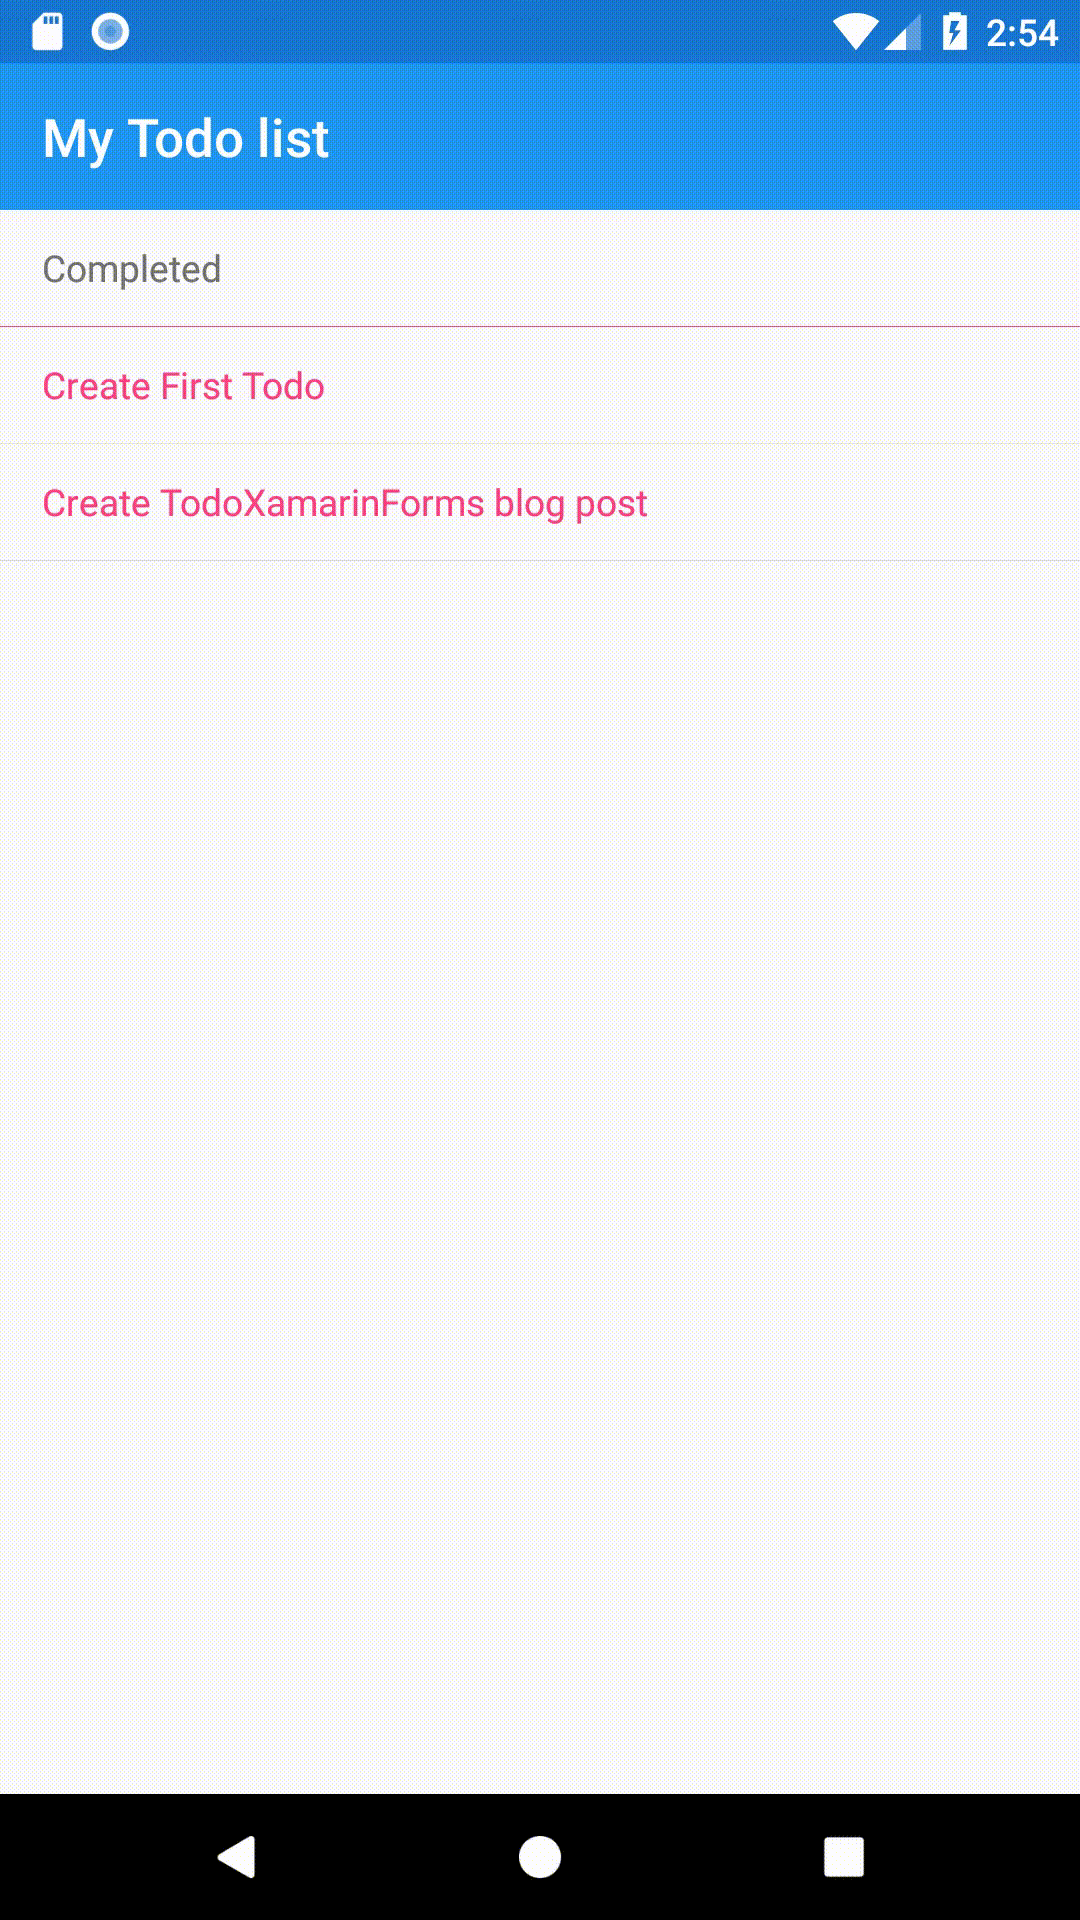
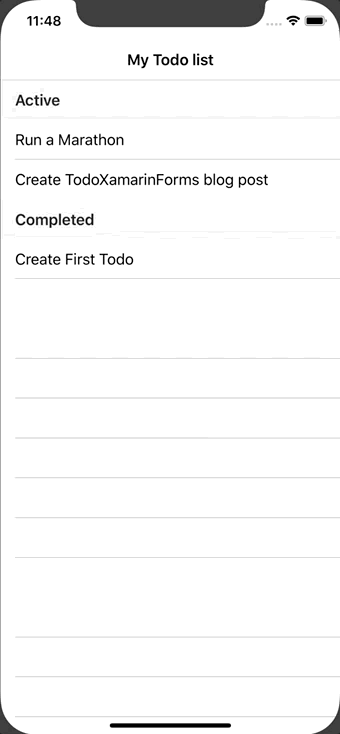
...Now when we run the app, we see our todo items separated out by their completion status.


Completing, Uncompleting and Deleting Items
Now that we’re showing our list of todos, we should let the user interact with them. We’ll start by adding the ability to complete, uncomplete, and delete items from the list.
The first thing we’ll do is create the UI for our actions. Fortunately this is built in to Xamarin Forms, so we just need to update our XAML. We’ll open TodoListView.xaml and update our ListView to show our actions.
<ListView ItemsSource="{Binding GroupedTodoList}"
            IsGroupingEnabled="True"
            GroupDisplayBinding="{Binding Key}"
            x:Name="TodoDisplayList">
    <ListView.ItemTemplate>
        <DataTemplate>
            <TextCell Text="{Binding Title}" >
                <TextCell.ContextActions>
                    <MenuItem Command="{Binding Source={x:Reference TodoDisplayList}, Path=BindingContext.ChangeIsCompleted }"
                                CommandParameter="{Binding .}" Text="Complete" />
                    <MenuItem Command="{Binding Source={x:Reference TodoDisplayList}, Path=BindingContext.Delete }"
                                CommandParameter="{Binding .}" Text="Delete" IsDestructive="True" />
                </TextCell.ContextActions>
            </TextCell>
        </DataTemplate>
    </ListView.ItemTemplate>
</ListView>
We made a couple changes to display our actions and prepare for implementing them. The first thing we did is we named our ListView . We need to do this in order to reference it in the new MenuItem tags. We then created two context menu items for our todos, one for Complete and one for Delete. There is some boilerplate we need to use to wire up our actions. This is because the data context for our TextCell is the TodoItem itself instead of the View Model, and we need to use commands on our View Model. We take care of this by setting the Source of our command binding to the TodoDisplayList and setting the path to our Command.
Right now our actions don’t do anything, but we set up the Command binding that we’ll use to add actual functionality to these buttons. One interesting thing to note is that these actions are displayed differently on iOS and Android. This is because Xamarin Forms is using the native list actions for each OS, with Android showing actions in the titlebar on long press and iOS revealing the actions inline on swipe.


Now we’ll wire up the buttons so they actually have an effect. Let’s start with the Delete command. We create a Delete property in TodoListViewModel and a HandleDelete method. Then in our constructor we set Delete to a new command that uses HandleDelete.
public TodoListViewModel()
{
    GroupedTodoList = GetGroupedTodoList();
    Delete = new Command<TodoItem>(HandleDelete);
}

...

public Command<TodoItem> Delete { get; set; }
public void HandleDelete(TodoItem itemToDelete)
{
    // Remove item from private list
    _todoList.Remove(itemToDelete);
    // Update displayed list
    GroupedTodoList = GetGroupedTodoList();
}
We follow similar steps to create the ChangeIsCompleted command.
public TodoListViewModel()
{
    GroupedTodoList = GetGroupedTodoList();
    Delete = new Command<TodoItem>(HandleDelete);
    ChangeIsCompleted = new Command<TodoItem>(HandleChangeIsCompleted);
}

...

public Command<TodoItem> ChangeIsCompleted { get; set; }
public void HandleChangeIsCompleted(TodoItem itemToUpdate)
{
    // Change item's IsCompleted flag
    itemToUpdate.IsCompleted = !itemToUpdate.IsCompleted;
    // Update displayed list
    GroupedTodoList = GetGroupedTodoList();
}
Now if we click our actions, we can see the list updating for our changes.
One thing worth noting is that our code is not optimized for long lists. Since we’re fully re-creating our grouped list anytime something happens, we’re forcing the application to re-render the entire list. We could improve our logic by changing items in place instead of regenerating the list, but that’s beyond the scope of this post.
Our actions work now, but a clever user might notice that we show a Complete action for both Active and Completed items. It would be better to change the text to something like Uncomplete when dealing with completed actions. We’ll do this with a Converter class. A Converter is a class that we can use to place conditional values, like text, color, visibility, etc, in our XAML. Create a new CSharp class called ChangeCompleteActionTextConverter.cs and add the following content.
using System;
using System.Globalization;
using Xamarin.Forms;

namespace TodoXamarinForms
{
    class ChangeCompleteActionTextConverter : IValueConverter
    {
        public object Convert(object value, Type targetType, object parameter, CultureInfo culture)
        {
            var isCompleted = (bool)value;
            return isCompleted ? "Uncomplete" : "Complete";
        }

        public object ConvertBack(object value, Type targetType, object parameter, CultureInfo culture)
        {
            // Not used since we only want to convert a boolean to text, and not the other way around
            throw new NotImplementedException();
        }
    }
}
Next we need to update our View to use this Converter. Before doing that, we should build our project to make sure the XAML compiler is aware of the new class. Then open TodoListViewModel.axml. We need to add a reference to our converter at the top of the file by adding a new namespace, xml:local, and creating a resource on our ContentPage.
<?xml version="1.0" encoding="utf-8" ?>
<ContentPage xmlns="http://xamarin.com/schemas/2014/forms"
             xmlns:x="http://schemas.microsoft.com/winfx/2009/xaml"
             x:Class="TodoXamarinForms.TodoListView"
             xmlns:local="clr-namespace:TodoXamarinForms"
             Title="{Binding Title}">
    <ContentPage.Resources>
        <ResourceDictionary>
            <local:ChangeCompleteActionTextConverter x:Key="ChangeCompletedActionTextConverter" />
        </ResourceDictionary>
    </ContentPage.Resources>
    ...
Then we update our Complete menu item to use our ChangeCompletedActionTextConverter with the IsCompleted property of the item.
...
<MenuItem Command="{Binding Source={x:Reference TodoDisplayList}, Path=BindingContext.ChangeIsCompleted }"
          CommandParameter="{Binding .}"
          Text="{Binding IsCompleted, Converter={StaticResource ChangeCompletedActionTextConverter}}" />
...
Now our ChangeIsCompleted button sets its text based on the selected item’s IsCompleted property.
There are two more things our app needs to be useful: the ability to add todo items and the ability to persist the todo list. We’ll start with persistence as it will be useful when we implement the add functionality.
Persisting the Todo List
Right now our todo list is held completely in memory and is reset to default anytime the app is closed or restarted. This isn’t exactly ideal behavior, so we want to persist the list in a way that allows us to keep track of changes across application restarts and device reboots. We’ll use SQLite to store our data, as it’s easily compatible with both operating systems.
The first thing we need to do is separate our data from our view model. We’ll create a new folder in TodoXamarinForms called Persistence and add the class TodoRepository. Next we copy our _todoList from the TodoListViewModel into the repository and create four methods: GetList, DeleteItem, ChangeItemIsCompleted, and AddItem. We’ll implement the first three here and later we’ll implement AddItem.
using System;
using System.Collections.Generic;
using System.Threading.Tasks;

namespace TodoXamarinForms.Persistence
{
    public class TodoRepository
    {
        private List<TodoItem> _todoList = new List<TodoItem>
        {
            new TodoItem { Id = 0, Title = "Create First Todo", IsCompleted = true},
            new TodoItem { Id = 1, Title = "Run a Marathon"},
            new TodoItem { Id = 2, Title = "Create TodoXamarinForms blog post"},
        };

        public Task<List<TodoItem>> GetList()
        {
            return Task.FromResult(_todoList);
        }

        public Task DeleteItem(TodoItem itemToDelete)
        {
            _todoList.Remove(itemToDelete);
            // We're using Task.Delay to simulate async behavior for now. It will be replaced by real async database calls
            return Task.Delay(100);
        }

        public Task ChangeItemIsCompleted(TodoItem itemToChange)
        {
            itemToChange.IsCompleted = !itemToChange.IsCompleted;
            // We're using Task.Delay to simulate async behavior for now. It will be replaced by real async database calls
            return Task.Delay(100);
        }

        public Task AddItem(TodoItem itemToAdd)
        {
            throw new NotImplementedException();
        }
    }
}
Note: This implementation leaves a lot to be desired, like safety checks to make sure an item exists before removing it. This is OK for now since we plan to replace it with real persistence soon.
Next we need to create an instance of this repository for our ViewModel to use. There are many ways to handle this, but for simplicity’s sake we’re just going to create a static field in App.xaml.cs
using TodoXamarinForms.Persistence;
using Xamarin.Forms;

namespace TodoXamarinForms
{
    public partial class App : Application
	{
        public static TodoRepository TodoRepository = new TodoRepository();
...
Now we can update TodoListViewModel to use the repository.
public TodoListViewModel()
{
GetGroupedTodoList().ContinueWith(t =>
{
GroupedTodoList = t.Result;
});
Delete = new Command<TodoItem>(HandleDelete);
ChangeIsCompleted = new Command<TodoItem>(HandleChangeIsCompleted);
}
...
private async Task<ILookup<string, TodoItem>> GetGroupedTodoList()
{
return (await App.TodoRepository.GetList())
.OrderBy(t => t.IsCompleted)
.ToLookup(t => t.IsCompleted? "Completed" : "Active");
}
public Command<TodoItem> Delete { get; set; }
public async void HandleDelete(TodoItem itemToDelete)
{
await App.TodoRepository.DeleteItem(itemToDelete);
// Update displayed list
GroupedTodoList = await GetGroupedTodoList();
}
public Command<TodoItem> ChangeIsCompleted { get; set; }
public async void HandleChangeIsCompleted(TodoItem itemToUpdate)
{
await App.TodoRepository.ChangeItemIsCompleted(itemToUpdate);
// Update displayed list
GroupedTodoList = await GetGroupedTodoList();
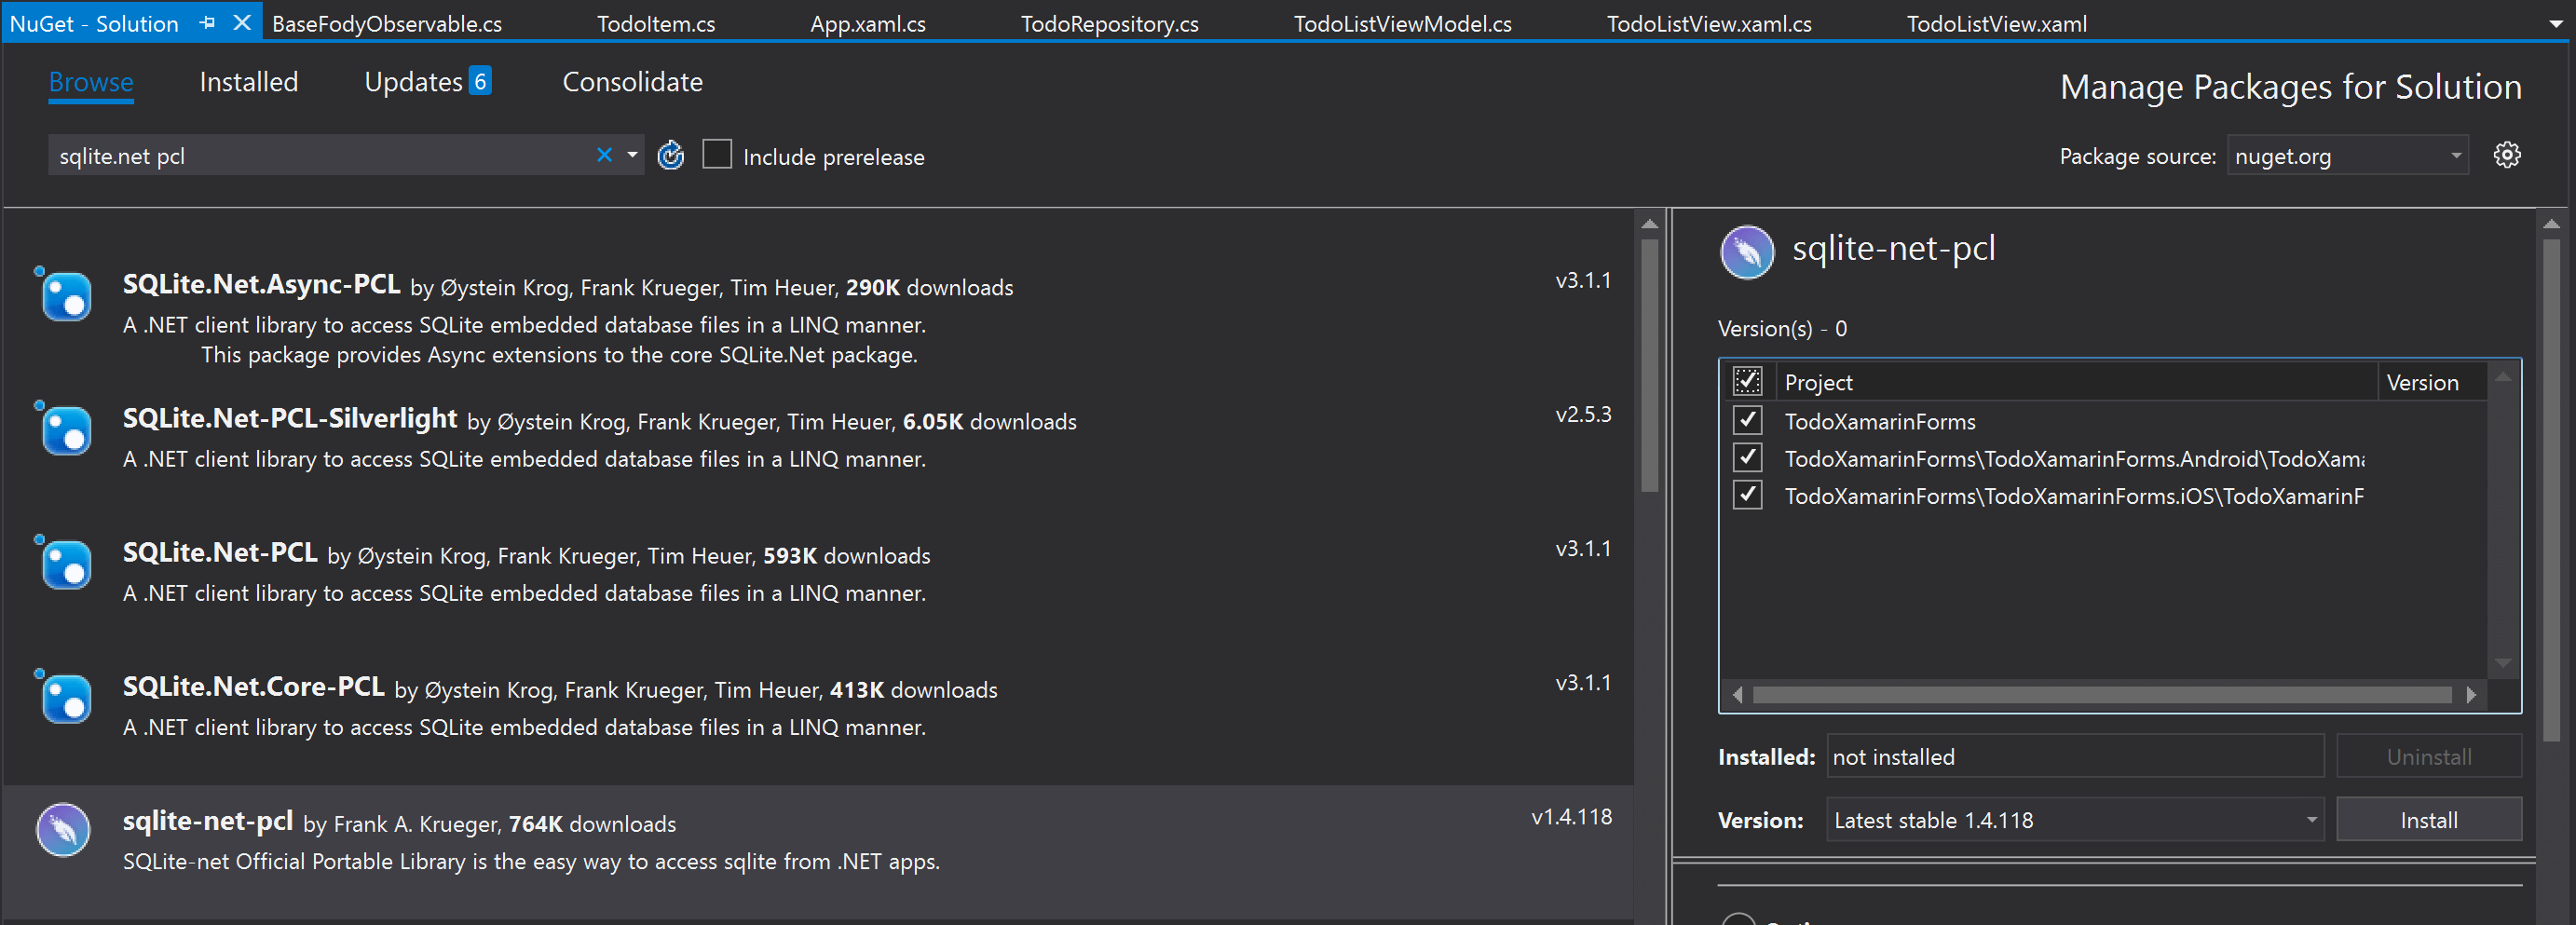
}Now that we’ve separated our data from our view model, we’re ready to start implementing real persistence. First off we need to install the sqlite-net-pcl package from nuget. Follow the same steps we used to install Foday, but add this package to all three projects. Make sure to install the correct package as there are many similarly named ones.
Now we need to update our TodoItem to play nicely with the database. We want to tell sqlite that our Id property is the primary key and that it should auto-increment. We can do this with a couple of attributes
using SQLite;

namespace TodoXamarinForms
{
    public class TodoItem : BaseFodyObservable
    {
        [PrimaryKey, AutoIncrement]
        public int Id { get; set; }
...
Next we want to update our TodoRepository to use the database instead of our in-memory storage.
using SQLite;
using System;
using System.Collections.Generic;
using System.Threading.Tasks;

namespace TodoXamarinForms.Persistence
{
    public class TodoRepository
    {
        private readonly SQLiteAsyncConnection _database;

        public TodoRepository()
        {
            _database = new SQLiteAsyncConnection("TODO: file path");
            _database.CreateTableAsync<TodoItem>().Wait();
        }

        private List<TodoItem> _seedTodoList = new List<TodoItem>
        {
            new TodoItem { Title = "Create First Todo", IsCompleted = true},
            new TodoItem { Title = "Run a Marathon"},
            new TodoItem { Title = "Create TodoXamarinForms blog post"},
        };

        public async Task<List<TodoItem>> GetList()
        {
            //TODO: remove once Add is implemented
            if ((await _database.Table<TodoItem>().CountAsync() == 0))
            {
                await _database.InsertAllAsync(_seedTodoList);
            }

            return await _database.Table<TodoItem>().ToListAsync();
        }

        public Task DeleteItem(TodoItem itemToDelete)
        {
            return _database.DeleteAsync(itemToDelete);
        }

        public Task ChangeItemIsCompleted(TodoItem itemToChange)
        {
            itemToChange.IsCompleted = !itemToChange.IsCompleted;
            return _database.UpdateAsync(itemToChange);
        }

        public Task AddItem(TodoItem itemToAdd)
        {
            throw new NotImplementedException();
        }
    }
}
Note the TODO in our constructor. SQLite needs to know where to store the database file. This has a different path on each operating system, so we can’t directly set it in our Standard project. Instead we’ll create an interface in the Standard project and implement it in each of our platform projects.
Add a new C# file to the Persistence folder in TodoXamarinForms called IFileHelper and add a method declaration for GetLocalFilePath
namespace TodoXamarinForms.Persistence
{
    public interface IFileHelper
    {
        string GetLocalFilePath(string filename);
    }
}
Now use this interface in the constructor of the TodoRepository. We’ll use Xamarin’s DependencyService to get the correct OS specific instance of our interface.
...
_database = new SQLiteAsyncConnection(DependencyService.Get<IFileHelper>().GetLocalFilePath("TodoSQLite.db3"));
...
That’s all we need to do in the Standard project. The steps for each platform-specific class are very similar, with slightly different implementation details.
FileHelper Android
Create a class in TodoXamarinForms.Android called FileHelper. This will implement our IFileHelper interface and use an attribute to tell Xamarin about it.
using System;
using System.IO;
using TodoXamarinForms.Droid;
using TodoXamarinForms.Persistence;
using Xamarin.Forms;

[assembly: Dependency(typeof(FileHelper))]
namespace TodoXamarinForms.Droid
{
    public class FileHelper : IFileHelper
    {
        public string GetLocalFilePath(string filename)
        {
            string path = Environment.GetFolderPath(Environment.SpecialFolder.Personal);
            return Path.Combine(path, filename);
        }
    }
}
FileHelper iOS
Just like on Android, create a class in TodoXamarinForms.Android called FileHelper. This will use the same interface and attribute as the Android implementation.
using System;
using System.IO;
using TodoXamarinForms.iOS;
using TodoXamarinForms.Persistence;
using Xamarin.Forms;

[assembly: Dependency(typeof(FileHelper))]
namespace TodoXamarinForms.iOS
{
    public class FileHelper : IFileHelper
    {
        public string GetLocalFilePath(string filename)
        {
            string docFolder = Environment.GetFolderPath(Environment.SpecialFolder.Personal);
            string libFolder = Path.Combine(docFolder, "..", "Library", "Databases");

            if (!Directory.Exists(libFolder))
            {
                Directory.CreateDirectory(libFolder);
            }

            return Path.Combine(libFolder, filename);
        }
    }
}
Now we can run the application. On both Android and iOS, the application will remember any changes we make across app restarts and device reboots.
Adding Todo Items
All this is well and good, but our app is still pretty useless without the ability to add new items. To do this we’re going to add a button that directs the user to an Add Todo Item screen that allows them to enter the item’s Title and save or cancel.
The first thing we want to do is create the button on both OSs. To do this we’ll wrap our ListView in a StackLayout and add a Button element.
<?xml version="1.0" encoding="utf-8" ?>
<ContentPage xmlns="http://xamarin.com/schemas/2014/forms"
             xmlns:x="http://schemas.microsoft.com/winfx/2009/xaml"
             x:Class="TodoXamarinForms.TodoListView"
             xmlns:local="clr-namespace:TodoXamarinForms"
             Title="{Binding Title}"
             xmlns:ios="clr-namespace:Xamarin.Forms.PlatformConfiguration.iOSSpecific;assembly=Xamarin.Forms.Core"
             ios:Page.UseSafeArea="true">
...
    <ContentPage.Content>
        <StackLayout Orientation="Vertical">
            <ListView ItemsSource="{Binding GroupedTodoList}">
...
            </ListView>
            <Button Command="{Binding AddItem}" Text="Add Todo Item" />
        </StackLayout>
...
Note: we also added a new namespace and directive to the Content Page. This tells the app to use the “safe area” on iPhone X devices and not place our button under the bottom bar. It has no effect on Android or other current iOS devices.


Next we’ll add a new ContentPage called AddTodoItem.xaml to our TodoXamarinForms project and create a basic layout containing a text entry, a cancel button, and a save button. Our bindings won’t do anything yet, but they’ll be useful when we create a view model for this page.
<?xml version="1.0" encoding="utf-8" ?>
<ContentPage xmlns="http://xamarin.com/schemas/2014/forms"
             xmlns:x="http://schemas.microsoft.com/winfx/2009/xaml"
             x:Class="TodoXamarinForms.AddTodoItem">
    <ContentPage.Content>
        <StackLayout Orientation="Vertical" VerticalOptions="Center">
            <Entry Placeholder="Todo Title" Text="{Binding TodoTitle}" />
            <StackLayout Orientation="Horizontal" HorizontalOptions="Center" >
                <Button Text="Cancel" Command="{Binding Cancel}" />
                <Button Text="Save" Command="{Binding Save}" />
            </StackLayout>
        </StackLayout>
    </ContentPage.Content>
</ContentPage>
Now we need to navigate to this screen when the user clicks our “Add Todo Item” button. To do this we first need to adjust our TodoListViewModel to take an INavigation as a constructor parameter and use that to implement our AddItem command.
        public TodoListViewModel(INavigation navigation)
        {
            _navigation = navigation;
...
            AddItem = new Command(HandleAddItem);
        }

        private INavigation _navigation;
...

        public Command AddItem { get; set; }
        public async void HandleAddItem()
        {
            await _navigation.PushModalAsync(new AddTodoItem());
        }
...
We’ll also need to update TodoListView.xaml.cs to pass in a Navigation object.
using Xamarin.Forms;
using Xamarin.Forms.Xaml;

namespace TodoXamarinForms
{
    [XamlCompilation(XamlCompilationOptions.Compile)]
	public partial class TodoListView : ContentPage
	{
		public TodoListView ()
		{
			InitializeComponent ();
            BindingContext = new TodoListViewModel(Navigation);
		}
	}
}
If we run our app, we’ll be able to navigate to our new screen by pressing “Add Todo Item” button.


The last things we need to do are creaet our View Model and implement AddItem in our repository. This is basically a repetition of many of the steps we’ve already done, so they won’t be listed in detail here.
First we create the view model.
using Xamarin.Forms;

namespace TodoXamarinForms
{
    class AddTodoItemViewModel : BaseFodyObservable
    {

        public AddTodoItemViewModel(INavigation navigation)
        {
            _navigation = navigation;
            Save = new Command(HandleSave);
            Cancel = new Command(HandleCancel);
        }

        private INavigation _navigation;
        public string TodoTitle { get; set; }

        public Command Save { get; set; }
        public async void HandleSave()
        {
            await App.TodoRepository.AddItem(new TodoItem { Title = TodoTitle });
            await _navigation.PopModalAsync();
        }

        public Command Cancel { get; set; }
        public async void HandleCancel()
        {
            await _navigation.PopModalAsync();
        }
    }
}
Then we set it as the binding context for our view.
...
public TodoListView ()
{
    InitializeComponent ();
    BindingContext = new TodoListViewModel(Navigation);
}
...
And implement AddItem in the repository.
...
public Task AddItem(TodoItem itemToAdd)
{
    return _database.InsertAsync(itemToAdd);
}
...
If we run the application now, everything will seem to work but we won’t see a newly added item on our list screen. This is because we have one step remaining: we need to refresh the list when it appears. To do this, we need to add a method to TodListViewModel.cs and call it in the OnAppearing lifecycle method of TodoListView.xaml.cs
...
public async Task RefreshTaskList()
{
    GroupedTodoList = await GetGroupedTodoList();
}
...
...
protected override async void OnAppearing()
{
base.OnAppearing();
await (BindingContext as TodoListViewModel).RefreshTaskList();
}
...Now when we run the application we’ll see new items appear in our list.


And there we have it! A functional Todo application on both iOS and Android built with Xamarin Forms. Obviously there’s a lot more we could do with this application, like customizing styles or adding application icons, but this gets us through the basics of creating a simple cross platform application.